Showing posts with label pillow cover. Show all posts

Monday, 24 March 2025

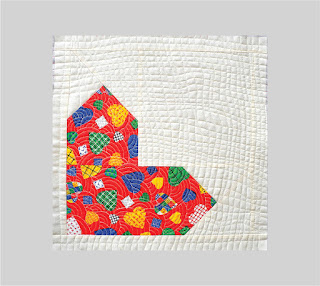
Bold Bow - new pillow cover block quilt pattern

 Hello, everyone!

I'm so glad to launch a new quilt block pattern I just finished to write!

I named it Bold Bow. It's obvious why, I think. 

Bold Bow pillow cover quilt pattern

So, a few words about it.

Bold Bow - One Block Pillow Cover Quilt Pattern  is a flexible and practical quilt pattern for intermediate quilters.

Finished Size:

  • Unfinished block before quilting: 17"
  • Finished pillow cover: 16"

Bold Bow pillow cover quilt pattern


Overview of the Pattern

This quilt pattern offers an elegant and simple approach to creating a one-block pillow cover with mitred corners. While at first glance, it may appear similar to other patterns with a central square, this design introduces a unique and efficient method of piecing the central square without fragmenting special prints or pieced blocks. The result? A seamless, polished look with minimal effort.

The Bold Bow pattern provides a step-by-step guide, ensuring a smooth sewing experience with clear instructions (and more than 40 images) and valuable tips. Even quilters who have struggled with achieving perfect piecing before will find success with this design.

The main steps of the pattern are:

  1. Preparing the materials
  2. Preparing the block units
  3. Assembling the block
  4. Finishing the pillow cover front
  5. Preparing the pillow cover back
  6. Assembling the pillow cover
  7. Finishing the pillow cover
  8. Layout variation ideas (plus suggestion for making a quilt from 16 smaller blocks - quilt math included).
Why Choose This Pattern?
  • Innovative Piecing Method: Unlike traditional designs that use QSTs or appliqué, this pattern offers a fresh approach that preserves the design continuity of feature prints or pieced blocks used in the central square.
  • Intermediate-Friendly: Ideal for those with experience handling bias-cut pieces.
  • Quick & Efficient: The block can be completed in under two hours, making it an excellent choice for quilters looking for a rewarding project without extensive time commitment.
  • Fabric Versatility: Works well with a variety of fabrics, including:
    • Quilting cotton
    • Thin denim
    • Cotton duck
    • Lightweight home decor fabric
    • Canvas

·   Fat quarter friendly

  • Great for Solid and Print Fabrics: Whether you prefer vibrant prints or classic solids, this pattern enhances the beauty of any fabric combination.

Bold Bow pillow cover quilt pattern

Bold Bow pillow cover quilt pattern

Bold Bow pillow cover quilt pattern


Fabric Requirements

  • Fabric 1: 12 ½" x 12 ½"
  • Fabric 2: 12 ½" x 12 ½"
  • Fabric 3 (stripe units fabrics): a piece of about 5" x 42" or 10" x 21"
  • Fabric 4 (stripe units fabrics): a piece of about 5" x 42" or 10" x 21"

Bold Bow pillow cover quilt pattern


Perfect for Quilters Who Want:

 A simple yet stylish one-block design.
 A reliable step-by-step guide with clear instructions.
 A time-efficient project with striking results.
 A chance to highlight special prints or intricate pieced blocks.

With Bold Bow, your pillow cover will come together effortlessly, allowing you to enjoy the creative process without unnecessary complexity. Whether you're making a single pillow, a set with layout variations, or a bed quilt, this pattern is designed to be both enjoyable and practical for quilters of all styles.

The Bold Bow quilt pattern is available now. Don’t wait – start your pillow cover quilt today!

Thank you for joining me in celebrating the launch of this special pattern!

Buy Bold Bow pillow cover block quilt pattern. Just 


It takes you to my Etsy Shop.


Bold Bow pillow cover quilt pattern

Have only beautiful sewing days, my dears!

Monday, 10 February 2025

Tutorial -- Love Thoughts - Valentine's Quilt Pillow cover (revised pattern)


10 years ago, at this time, I posted on the blog a pattern dedicated to Valentine's Day. 

I revised it and I share the new version of it with you today.


Overview


To sew this block, we use the Sew & Flip method.


Materials


Fabric Options

Quilting cotton, thin denim.
- Solid colors and non-directional prints work best.
- Wash and press the fabric. Starching cotton quilting fabric and thin fabrics helps achieve accurate edge of the pillow cover.

Cutting

- fabric A (accent fabric) - (1) 6" x 9½" and (1) 6” x 15”
        - fabric B (background) - (6) 6"; (1) 9½" squares
                                               -  (2) 1½” x 15”; (2) 1½” x 17” (border). 

Assemble the block

Place the 6” x 15” piece of the accent fabric right side up. Align over its right edge one 6” square of the background fabric wrong side up. Draw a diagonal line onto the background 6” square from the up left corner to the down right corner (see the dashed line). Stitch on the diagonal marking.  Follow the marked line as accurately as you can, in order to get a neat finished piece. Trim the corner off 1/4” away from the stitched line.


Flip the triangle open and press seam allowance toward A fabric rectangle. Align over the triangle of B fabric, another 6” square wrong side up. Mark a diagonal line from the down left corner to the up right corner. 


Stitch on the diagonal marking. Trim the corner off ¼” away from the marked line. Flip the triangle open and press the seam allowance toward the corner triangle. 


Repeat for the second unit.


Sew together the 6” x 9½” unit and 9½” B fabric square with ¼” seam allowance. Place them like in the next images. Press the seam allowances toward the B fabric square.  


Sew together this unit with the first unit with ¼” seam allowance. Press the seams toward the latter. Press. The block should measure about 14¾” - 15”, depending on the accuracy of how you sewed. Add the border pieces. Now, the unfinished block should measure 17".  


Quilting

One of the most beautiful ways to finish a patchwork project is by quilting it. 
Layer:
- at the bottom - 19" x 19" backing fabric, right side down
- in the middle - the 19" x 19" piece of batting
- on top - the block, right side up.
Baste the layers together and enjoy quilting your preferred design. I used a temporary glue spray for basting.


Finishing

Wash the quilt with cold or lukewarm water and mild detergent. 
Lay the quilt flat to dry, smoothing it gently. After drying, press it on the back side, only if needed.
While it dries, prepare the pillow back.
Trim the quilt to 16½”. 


Sew the quilt (which is the front of the pillow)  with the back together.


You're done!

Your Valentine pillow cover is complete. 
As Valentine's Day is a holiday when lovers express their affection with greetings and gifts, don’t stop. Sew this pattern in pairs of pillows.


I hope you'll enjoy making these cuties as much as I do.

If you need other patterns for quick and easy modern quilts or bags, 

It takes you to my Etsy Shop.

All orders made during February 2025 will receive as bonus the quilt pattern Love Thoughts in PDF format.

Have a beautiful sewing day, my friends!
Thank you for your support!


Sunday, 8 December 2024

Granny Pillow - new pillow cover pattern


As we approach the final weeks of the year, many of us are making plans to decorate our homes for the holidays and creating gift lists for our loved ones. In the spirit of this festive season, I'm thrilled to introduce a charming addition to your holiday preparations: the Granny Pillow pattern!

a pile of multicolor pillows with waived border edges on a wooden chair.

The idea for this pattern blossomed during my holiday decorating frenzy. I couldn’t resist purchasing a few yards of fabric adorned with nostalgic holidays prints. The festive designs sparked my creativity, and I envisioned a pillow cover that exudes both romance and nostalgia. After experimenting with different border designs and sewing techniques, the concept of the Granny Pillow was born.


A green pillow with waived border edge.


What Makes Granny Pillow Special?

The standout feature of the Granny Pillow is its decorative edging.

This beautiful border is crafted using a simple yet effective sewing technique, which is thoroughly detailed in the pattern. Whether you're an experienced sewer or just starting out, this project is accessible and rewarding.

Here’s what the pattern offers:

Three Border Designs in One Pattern: Templates for three unique border styles are included, making this a versatile and value-packed project.

Perfect Dimensions: The pattern is drafted for a 16" pillow insert, with a finished size of 19 ½" x 19 ½", including the decorative border.

Quick and Easy: With a little patience, basic sewing machine skills, and half yard of fabric (at least 44" wide) you can complete the pillow cover in just 2-3 hours.


Imagine the Possibilities

Picture how stunning your living space will look with these romantic, bordered pillows adorning your bed, chair, or sofa. The Granny Pillow design adds a cozy, vintage charm to any setting, making it a delightful addition to your home decor.


Four holiday print pillows, placed one behind the other on a beige sofa.

Why You’ll Love Sewing Granny Pillow

Fun and Creative: Experiment with fabrics and patterns to create a look that’s uniquely yours.

Perfect for Gifting: Handmade pillow covers are thoughtful and personal gifts that your loved ones will treasure.

Beginner-Friendly: The instructions are clear and easy to follow, ensuring a smooth sewing experience.


Get Started Today!

The Granny Pillow pattern is available now. Treat yourself to the joy of creating something beautiful and meaningful this holiday season. Don’t wait – start your Granny Pillow journey today and add a touch of nostalgic elegance to your home or gift list!

The cover of the Granny pillow - Bounded pillow cover pattern

Thank you for joining me in celebrating the launch of this special pattern.

Let’s make this holiday season extra cozy and memorable!

Buy Granny Pillow - bordered pillow cover pattern from 

HERE


Have a beautiful day!


Sunday, 29 September 2019

About Illusions

An intriguing post title, isn't it? Don't be afraid!I am not going to bore you with some philosophical considerations.
This is the name of Geta Grama's newest quilt pattern I used for sewing two pillow covers.


abeeautifulday.blogspot.com-pillow covers using Geta Grama's pattern -Illusions II-


In fact it was the best opportunity to practice Y-seams in order to make a kaleidoscope block.


abeeautifulday.blogspot.com-pillow covers using Geta Grama's pattern -Illusions II-


I'm not into kaleidoscope quilts at all. My past experiences made me to conclude that I'm incompatible with this kind of technique. Even though I'm a patient person, paying attention to details, I had enough of mistaken again and again the Y-seam and of getting incomplete or shifted layouts.
Knowing that Geta is a meticulous teacher, I got Illusions II pattern as my last chance to make a decent kaleidoscope quilt.
And my expectations were confirmed. I'm not incompatible with this sewing technique, I just didn't know those tips and tricks so important for the exact piecing.


abeeautifulday.blogspot.com-pillow covers using Geta Grama's pattern -Illusions II-


abeeautifulday.blogspot.com-pillow covers using Geta Grama's pattern -Illusions II-


As always, Geta putted in her pattern a lot of sewing knowledge, useful not only for making this very block, but also for other types of patchwork projects, like:
- how to cut triangles in three different ways;
- how to accurately piecing in the easy way;
- how to finish the block as pillow cover in any size and as place mat;
- how to make a pillow insert;
- how to use the entire width of the fabric;
and a lot of other instructions that guide you so well that you can finish your project in one day only.
At the end of it, if you followed conscientiously Geta's instructions,  you might consider that you just stepped in the experienced quilters world.


abeeautifulday.blogspot.com-pillow covers using Geta Grama's pattern -Illusions II-


abeeautifulday.blogspot.com-pillow covers using Geta Grama's pattern -Illusions II-


Have a beautiful sewing day, my dears!


Tuesday, 16 January 2018

Welcome 2018! - Anahata quilt


Anahata quilt pillow - abeeautifulday.blogspot.com


The heart chakra, or Anahata in its original Sanskrit name, colors our life with compassion, love, and beauty.

Anahata is unifying chakra. It is the healing center.
It means living your life with loving kindness and compassion towards others. It means that your heart is open to others and you inspire kindness and compassion in others. It is associated with balance, calmness, and serenity.

Anahata moves love through our life.
Its color is green, higher energy frequencies can turn to pink.

We are used that an effect is produced by the confrontation of two opposite forces.

At the level of Anahata chakra appears the possibility to integrate the two opposite forces without the two forces to be confronted. The energy is specific to cooperation and integration, which brings peace and a new perspective in a world which, up to this level was made only of a more or less conscious confrontation between opposing forces. 

Anahata pillow cover quilt- abeeautifulday.blogspot.com

So, these being said, I hope you understand why I considered a challenging task to make a quilt illustrating the symbol of Anahata. The friend who asked me to do it is a lovely person and I could not refuse. 

The quilt should have been ready before the winter holidays, but I could not decide which quilting technique would be more appropriate.

Anahata pillow cover quilt- abeeautifulday.blogspot.com

One big question was also: To use a single fabric or more?
Using more fabrics, the quilt would definitely come out, more appealing, more vibrant. Paper piecing or applique would probably have been the most suitable sewing technique. 
But reading, again and again, the meaning of the Anahata symbol, I realized that, this way it would be more difficult to express its essential traits: balance, calmness, and serenity.

Anahata pillow cover quilt- abeeautifulday.blogspot.com


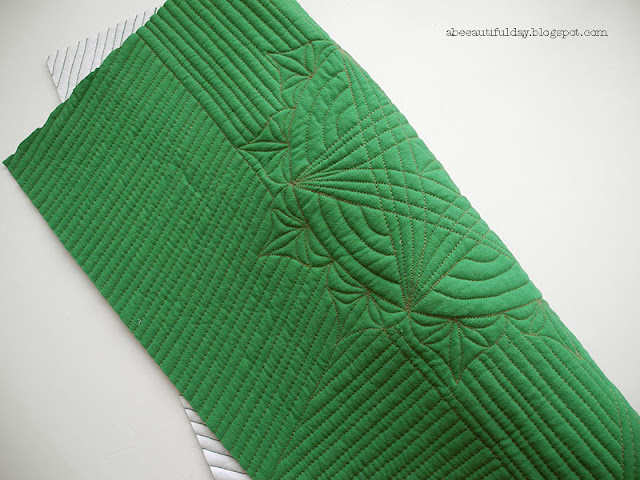
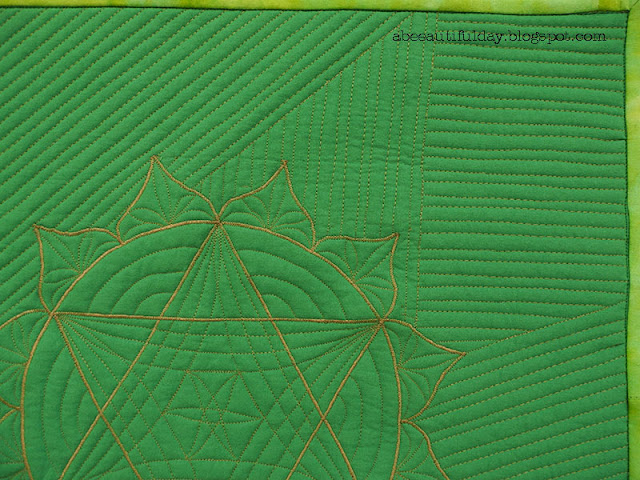
Finally, I came to the conclusion that a wholecloth quilt is the most appropriate form of expression: I will use a single fabric, in the defining color of the symbol, green, and a single thread color with which I will draw/stitch/quilt the contours of the elements. And as I had to suggest the invisible energy flows and one of the seven main wheels of energy (chakras), I used a color of thread having a low degree of visibility as against the background. 

Anahata pillow cover quilt- abeeautifulday.blogspot.com

For background, I chose to use quilting with straight lines, in various orientations, in order to express the confrontation between opposing forces of the life. Their density is similar with the density of the rounded lines inside the symbol, in order to require more time for the eye to separate the details of the Anahata symbol from those of the background, just as the knowledge of one's own self is a process that requires time, willpower, patience, and depth in thinking and senses.

In choosing the green shade I had a practical reason: it is a friendly shade with a wide range of colors, so it can help to create a welcoming interior.

Anahata pillow cover quilt- abeeautifulday.blogspot.com

One more thing about the thread:  I used Mako NE 50/2 from Aurifil, which was a real performer of this quilt.
There was no need to change any settings on the sewing machine. The thread never broke. It worked wonderfully.
Aurifil thread has a soft shining and blends so well with the fabric.
It is indeed a quality thread. Free motion quilting with it was a real pleasure.

Anahata pillow cover quilt- abeeautifulday.blogspot.com


All in all, Anahata is a special quilt, as the meaning of its elements guides the aesthetic expression and precedes it in terms of importance. That's why at first glance it may go unnoticed. 

Anahata pillow cover quilt- abeeautifulday.blogspot.com


But for the future owner of this pillow - because this way it will be used - I'm sure it will become one of the most loved pieces of decoration in her new home.

Have a beautiful year, my dears!