Monday, 11 November 2024

Easy-Peasy all-in-one Yoga Bag - new pattern

Hello everyone!


Long time no see, I know, but here I am!

I'm so happy to tell you a few things about my new bag pattern! The name speaks for itself: 

Easy-peasy all-in-one Yoga Bag. 


Bag in pink and white patterned fabric with a yoga mat held in the bottom.

It is a special bag pattern. 

What makes this pattern special? When you look at the bag, you don't see anything special in its appearance. It has a common shape. What makes it different is its interior. I'm particularly proud of two things I managed to work out in this pattern: on the one hand, the built-in lower space (not added as an outer sleeve, as many such bags have) for carrying a yoga mat, and on the other hand, the extremely simple way in which I made room for it.


A bag in pink and white patterned fabric opened, showing the interior compartments, with a yoga mat held in the bottom . The blog URL 'abeautifulday.blogspot.com' is written at the bottom in pink text.


A bag in pink and white patterned fabric with a yoga mat held in the bottom. The blog URL 'abeautifulday.blogspot.com' is written at the bottom in pink text.

The finished size of this bag is 16" height x 13" width, but the pattern includes a cutting guide that allows you to make it in four different sizes and three shapes. This guide helps you adapt the pattern to suit your needs, to create bags in different proportions to fit the use or style preference.

Tote bags made of various colored fabrics, having various sizes and shapes, suspended in a stand. The blog URL 'abeautifulday.blogspot.com' is written at the bottom in pink text.

The pattern also offers several illustrated suggestions on how to personalize your tote bag.

A bag in turquoise and white patterned fabric with a drawing tube held in the bottom. The blog URL 'abeautifulday.blogspot.com' is written at the bottom.

Tote bag in natural canvas with black handles, featuring a black and white patchwork square design on the front. The blog URL 'abeautifulday.blogspot.com' is written at the bottom in pink text.

When it comes to fabrics needed to make it, you have a choice: denim, lightweight cotton duck, lightweight home decor fabric, quilting cotton, or canvas.

Tote bag in natural canvas featuring a black and white applique word "Breezy" on the front, with a yoga mat held in the bottom. The blog URL 'abeautifulday.blogspot.com' is written at the bottom in black text.

The Easy-peasy Yoga Bag Pattern is the perfect project for creating a versatile, durable, and stylish bag. Its simple, clever construction makes it easy to assemble while still offering room for customization and creativity. Follow the instructions and let your imagination guide you as you craft your very own unique yoga bag!
Cover image of a sewing pattern for an Easy-Peasy All-in-One Yoga Bag by Mihaela Alexandrescu. The bag is shown in pink and white patterned fabric with a yoga mat held in the bottom. Size without straps: 16” high x 13” wide.
What do you say? Do you want to give it a try?
Just click on the button below to purchase the pattern.


Have a beautiful sewing day, my dears!

Tuesday, 30 January 2024

How to finish the quilt - The facing method

The face binding method hides the quilt's raw edges while freeing the quilt design from the visual binding's frame. It is very useful for the wall hanging quilts, but it can be used for any type of modern quilt. It also reduces bulk in the corners, and provides nice clean turned edges.There are several ways of doing it. I will show you how I did it.

abeeautifulday.blogspot.com-How to finish the quilt-The facing method


Facing the quilt with hanging corners

I used the same tools I use for binding.
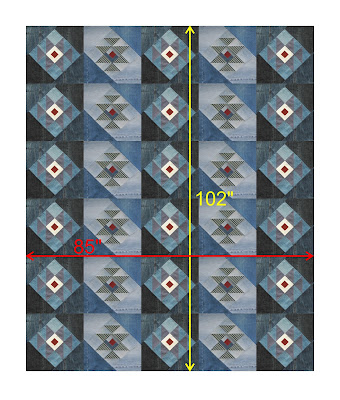
1. I trimmed the quilt. I measured the length and the width of the quilt (approx. 85" x 102)
abeeautifulday.blogspot.com-How to finish the quilt-The facing method
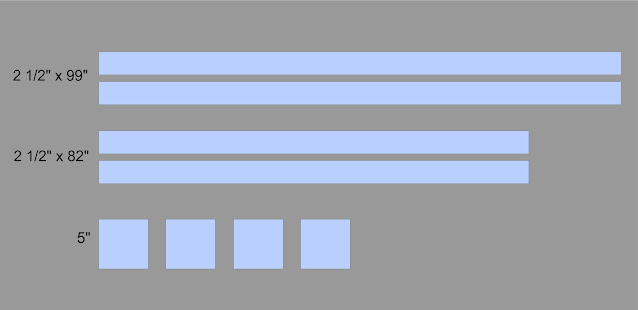
2. For each of the four quilt edges I prepared four strips of fabric 2 ½" wide and 3" shorter than each side of the quilt. In my case – (2) 2 ½" x 82" and (2) 2 ½" x 99" (you might keep the strip uncut and trim it when sewing, right before you get to the quilt corner). For each corner of the quilt I cut four 5" squares. 
abeeautifulday.blogspot.com-How to finish the quilt-The facing method


3. I folded in half lengthwise right side out the four strips and pressed them with iron. I folded each square diagonally in half right side out to make triangles and pressed them. 

abeeautifulday.blogspot.com-How to finish the quilt-The facing method


4. I placed the quilt on a flat surface (floor) with the top facing up. I pinned the four triangles in each corner of the quilt with the raw edges of the triangles aligned with the raw edges of the quilt. I stitched the corners in place with ¼ " seam allowance.
 
abeeautifulday.blogspot.com-How to finish the quilt-The facing method


5. I centered and pinned the four folded strips along each corresponding side of the quilt, on top of the triangles, with the raw edges aligned with the raw edges of the quilt, leaving a 1 ½" gap at each corner of the quilt. 
abeeautifulday.blogspot.com-How to finish the quilt-The facing method


6. I stitched all the way around the edge of the quilt with a ¼' seam allowance, overlapping the corner seam lines. 

abeeautifulday.blogspot.com-How to finish the quilt-The facing method


If  you use a continuous strip, trim it right before you get to the quilt corner

abeeautifulday.blogspot.com-How to finish the quilt-The facing method


I clipped the four corners avoiding the seams.

abeeautifulday.blogspot.com-How to finish the quilt-The facing method


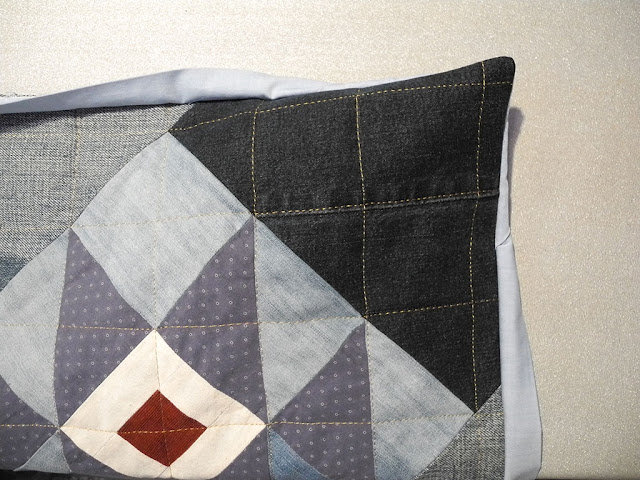
7.  I flipped the triangles to the back and, with a pen with the cap on, I carefully pushed all the corners out to give them a nice finish. I pressed the triangles in place. I pressed the strips away from the quilt. Then I folded, pressed them with steam to the back side of the quilt, having about 1/16″ of quilt front showing on the back.

abeeautifulday.blogspot.com-How to finish the quilt-The facing method


abeeautifulday.blogspot.com-How to finish the quilt-The facing method


9. Keeping the quilt with the top up, I stitched by machine all the way around at 7/8 of an inch away of the quilt edges (the facing strips are 1" wide) to secure the strips to the back of the quilt. If you want that the stitching to be invisible on the quilt top, stitch the strips to the back of the quilt by hand.

abeeautifulday.blogspot.com-How to finish the quilt-The facing method

abeeautifulday.blogspot.com-How to finish the quilt-The facing method


abeeautifulday.blogspot.com-Meeting with friends quilt pattern


abeeautifulday.blogspot.com-How to finish the quilt-The facing method


I hope you find this post helpful. 
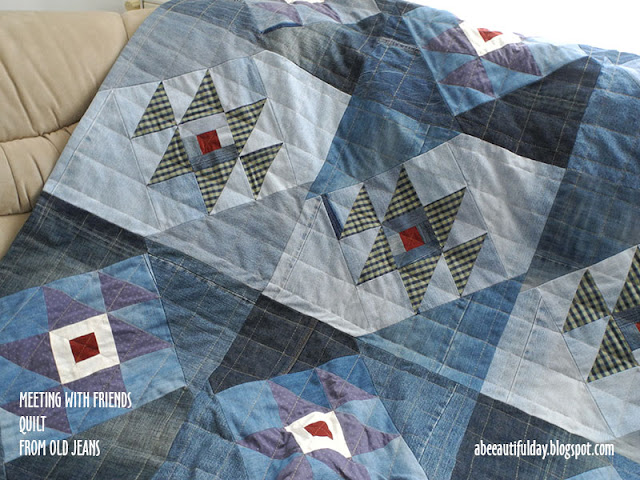
I used this method to finish a quilt made from old jeans and men's shirts, following the instructions of "Meeting with friends" quilt pattern.

abeeautifulday.blogspot.com-Meeting with friends quilt pattern


Have a beautiful sewing day, my dears!

Monday, 29 January 2024

How to use old jeans for sewing a quilt. Some useful tips to make your work easier


abeeautifulday.blogspot.com-How to use old jeans for sewing a quilt


I like denim. I’ve always liked to wear jeans, denim jackets, denim shirts or pinafore dresses. So, the desire to make a quilt from this kind of cloth came naturally. I asked my family and friends to give me jeans they no longer wore, and in time I managed to collect about 15-20 pairs.

In August 2023 I decided to use this pattern and started making the quilt using 10 pairs of jeans and two men's shirts. I finished it in January 2024 after taking about a three-month sewing break.

When it comes to sew quilts made of old jeans, the easiest design is the one of pieces measuring about 5" side and which allows the color shades to be randomly placed. The internet is full of incredible improvisational denim quilts that are a valuable source of inspiration. But in this post, I'll talk about the key aspects of my experience sewing a quilt with a structured pattern, which requires a certain sequence for color/shade variation and pieces with sides up to 10 inches.

abeeautifulday.blogspot.com-How to use old jeans for sewing a quilt

In a nut shell, I made a quilt composed of 30 blocks, measuring around 85" x 102" (215 cm x 250 cm) with the block size of 17"(43.5 cm), using 2 sets of fabrics.

The fabric for the quilt must be carefully chosen: too much stretch in jeans fabric gives a wonky shape in the block pieces. To better maintain their shape, I opted for minimal to no stretch jeans.

I used light, medium, and dark colored jeans for the block background. I cut the pieces from each color so I could get a light-to-dark shade effect. I also used two men's shirts as focus fabrics, a piece from another shirt for the blocks' central squares, and store-bought cotton fabric for backing and facing (rather than binding).

I washed and lightly ironed/pressed each pair of jeans, shirts and backing fabric. 


abeeautifulday.blogspot.com-How to use old jeans for sewing a quilt


From each leg of the jeans I cut strips with the width on the size of the pieces that I was going to get from them. Then I worked in different ways with them:

- from one tube-like strips I cut the seams and then I cut the unfolded strips into necessary pieces.

abeeautifulday.blogspot.com-How to use old jeans for sewing a quilt


- on others, first I unstitched the seams to increase a little bit their length, I pressed, and then I cut them in pieces.

abeeautifulday.blogspot.com-How to use old jeans for sewing a quilt


abeeautifulday.blogspot.com-How to use old jeans for sewing a quilt


from another ones I cut two pieces at a time keeping the tube strip lying flat.

abeeautifulday.blogspot.com-How to use old jeans for sewing a quilt


For each block I joined the denim pieces with different degrees of discoloration aiming to achieve a certain design when assembling the blocks.


abeeautifulday.blogspot.com-How to use old jeans for sewing a quilt


abeeautifulday.blogspot.com-How to use old jeans for sewing a quilt

abeeautifulday.blogspot.com-How to use old jeans for sewing a quilt


To get more use out of the fabric I even used pieces that included seams but I carefully adjusted them to avoid bulk.

abeeautifulday.blogspot.com-How to use old jeans for sewing a quilt


abeeautifulday.blogspot.com-How to use old jeans for sewing a quilt


 I kept the seam out of the corners though, because much bulk in the corners makes the pieces too thick to sew.

abeeautifulday.blogspot.com-How to use old jeans for sewing a quilt


I pieced the quilt top using ¼" seams and I pressed them open. For thick denim I recommend ½" seams. Pressing is essential to obtain accurate seams and making your quilt lie flat.

On the stretch jeans areas I placed the iron on them and hold it still. To move it to a different part of the pieced block, I lifted it up and place it in a new spot.  Moving the iron around on the fabric can stretch it out.  Flat seams need a careful steam pressing.

abeeautifulday.blogspot.com-How to use old jeans for sewing a quilt


 I used regular polyester thread for piecing, machine embroidery thread for quilting, jeans needle for both piecing and quilting, and free motion foot for quilting. I chose the quilting thread to match the gold colored double stitching of the jeans. I quilted with straight stitching.

abeeautifulday.blogspot.com-How to use old jeans for sewing a quilt


abeeautifulday.blogspot.com-How to use old jeans for sewing a quilt


Instead of binding I chose faced binding. It was the best choice for this denim quilt: the edges came out nice, thin, straight and flat. I wrote a separate blog post about how I finished this quilt using The facing method.

abeeautifulday.blogspot.com-How to use old jeans for sewing a quilt


Because I only had a few pieces of each color shade, setting up them took a lot of attention in order to get repetitive sequences. Here is the result:

abeeautifulday.blogspot.com-How to use old jeans for sewing a quilt


abeeautifulday.blogspot.com-How to use old jeans for sewing a quilt


abeeautifulday.blogspot.com-How to use old jeans for sewing a quilt


Have a beautiful sewing day, my dears!


Monday, 12 June 2023

Meeting with friends quilts. Pattern release

I am so glad that after long time, I finally have great news: I just released two quilt patterns!

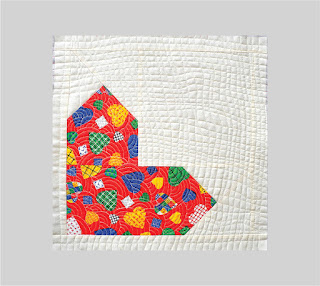
In the late fall of 2021, while the rules imposed in the Pandemic kept us far from each other, I made some patterns for some mini quilts, good to use as coasters. For one of them I wrote the pattern because I realized that it is not only beginner friendly, but also you need only an hour or two to make it. I chose squares, rectangles and half square triangles to play with.

abeeautifulday.blogspot.com-Meeting with friends mini quilt pattern

It's not by chance that I called it “Meeting with friends” as that was the idea I wanted to express:

The central unit symbolizes the table that gathers friends around it. Two triangles meeting at their points symbolizes the friends. The resulting  extension of their lines forms an X-cross, a very harmonious sign for meeting, and the ancient symbol for time (the hourglass).

abeeautifulday.blogspot.com-Meeting with friends mini quilt pattern

This block combines in a simple and modern manner two of the most used patchwork layouts: Log Cabin and Half Square Triangle (HST).

Because Christmas was approaching, I used fabrics in the colors and prints specific to the winter holidays, but the block looks great using a wide variety of color combinations and prints (except large prints).

abeeautifulday.blogspot.com-Meeting with friends mini quilt pattern

Meeting with friends mini quilt measures 8 ¾" x 8 ¾" (22.5 cm x 22.5 cm) before quilting and washing.

It can be used to be displayed on the wall, added to a bag, as well as on the table as a mug rug. For the wall, you should add a sleeve or hanging pockets to the back of the quilt before binding so that the binding covers the raw edges and gives a neat finish (these instructions are not included in this pattern).

abeeautifulday.blogspot.com-Meeting with friends mini quilt pattern

Then, one of my friends who helped me testing the pattern, asked me to enlarge the block for making a pillow cover. So it came out a 17” (43.5 cm) square block and I got to the point where the natural question arose: what would a quilt from several such blocks look like? I designed layouts and layouts, searching “the one”, the versatility of this block giving endless set ups and quilt styles.

It was hard to choose which layout I will use for making a sample quilt, but in the end I chose this one:

abeeautifulday.blogspot.com-Meeting with friends quilt pattern

Meeting with friends quilt is based on only one 17” quilt block. It is a user-friendly pattern and provides step by step color photo guide and instructions to cut and machine piecing, and gives also hints and tips which will help you to assemble this quilt faultless.

 The quilt measures 67" x 84" (170 cm x 210 cm) before washing and quilting.

Quilt sizes based on 17"/43.5 cm “Meeting with friends” block:

- Baby/Crib - approx. 34" x 50½" (86.5 cm x 128 cm) 

- Throw - approx. 50½" x 50½" (128 cm x 128 cm) 

              - approx. 50½" x 67" (128 cm x 170 cm)

- Twin - approx. 67" x 84" (170 cm x 210 cm)  (the quilt featured in this pattern).

- Full/Queen - approx. 84" x 100" (210 cm x 254 cm).

 It's an easy quilt pattern even for the beginning quilters and it is perfect for anyone who wants to sew a simple, cheerful, quick and modern quilt.

abeeautiulday.blogspot.com-Meeting with friends quilt pattern


Meeting with friends quilt is not difficult to make, but it does require a bit of precision.

 In this pattern you will find also suggestions and information for sewing quilts with different layouts, settings, dimensions and color combinations based only on this block.

This pattern is Fat Eighths, Fat Quarter and yardage friendly.

abeeautiulday.blogspot.com-Meeting with friends quilt pattern

Look how beautiful turn out my One block-pillow covers! Using only one 17" Meeting with friends block and your scrap pile, you could cheer up your dining room, bedroom and/or porch.  


abeeautiulday.blogspot.com-Meeting with friends quilt pattern

Both patterns are also budget-friendly because they give you the opportunity to use up your leftover fabrics for which you have been waiting for the quilts that will deserve them.

 If you don't want a busy quilt design and you are looking for a fast project for which you don't need any fancy tools, but only very basic quilting supplies, then these two quilts are for you!

You’ll end up with beautiful quilts that look like a pro made them!

Would you like to make at least one Meeting with friends mini quilt or quilt of your own? You can purchase this patterns by clicking here. You can get this patterns at a 25% OFF INTRODUCTORY PRICE now through Thursday, June 15 2023.

Thank you my friends!

Have a beautiful sewing day!