Showing posts with label tips and tricks. Show all posts

Tuesday, 30 January 2024

How to finish the quilt - The facing method

The face binding method hides the quilt's raw edges while freeing the quilt design from the visual binding's frame. It is very useful for the wall hanging quilts, but it can be used for any type of modern quilt. It also reduces bulk in the corners, and provides nice clean turned edges.There are several ways of doing it. I will show you how I did it.

abeeautifulday.blogspot.com-How to finish the quilt-The facing method


Facing the quilt with hanging corners

I used the same tools I use for binding.
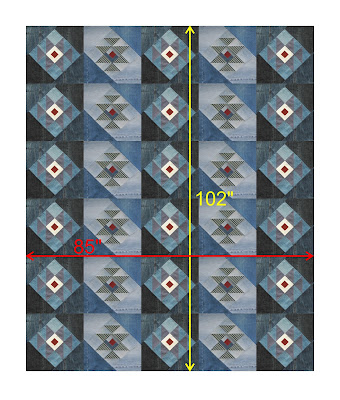
1. I trimmed the quilt. I measured the length and the width of the quilt (approx. 85" x 102)
abeeautifulday.blogspot.com-How to finish the quilt-The facing method
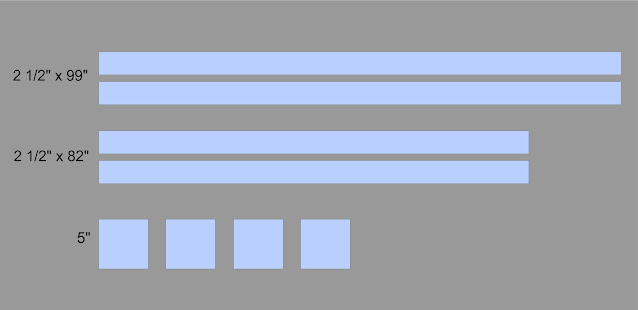
2. For each of the four quilt edges I prepared four strips of fabric 2 ½" wide and 3" shorter than each side of the quilt. In my case – (2) 2 ½" x 82" and (2) 2 ½" x 99" (you might keep the strip uncut and trim it when sewing, right before you get to the quilt corner). For each corner of the quilt I cut four 5" squares. 
abeeautifulday.blogspot.com-How to finish the quilt-The facing method


3. I folded in half lengthwise right side out the four strips and pressed them with iron. I folded each square diagonally in half right side out to make triangles and pressed them. 

abeeautifulday.blogspot.com-How to finish the quilt-The facing method


4. I placed the quilt on a flat surface (floor) with the top facing up. I pinned the four triangles in each corner of the quilt with the raw edges of the triangles aligned with the raw edges of the quilt. I stitched the corners in place with ¼ " seam allowance.
 
abeeautifulday.blogspot.com-How to finish the quilt-The facing method


5. I centered and pinned the four folded strips along each corresponding side of the quilt, on top of the triangles, with the raw edges aligned with the raw edges of the quilt, leaving a 1 ½" gap at each corner of the quilt. 
abeeautifulday.blogspot.com-How to finish the quilt-The facing method


6. I stitched all the way around the edge of the quilt with a ¼' seam allowance, overlapping the corner seam lines. 

abeeautifulday.blogspot.com-How to finish the quilt-The facing method


If  you use a continuous strip, trim it right before you get to the quilt corner

abeeautifulday.blogspot.com-How to finish the quilt-The facing method


I clipped the four corners avoiding the seams.

abeeautifulday.blogspot.com-How to finish the quilt-The facing method


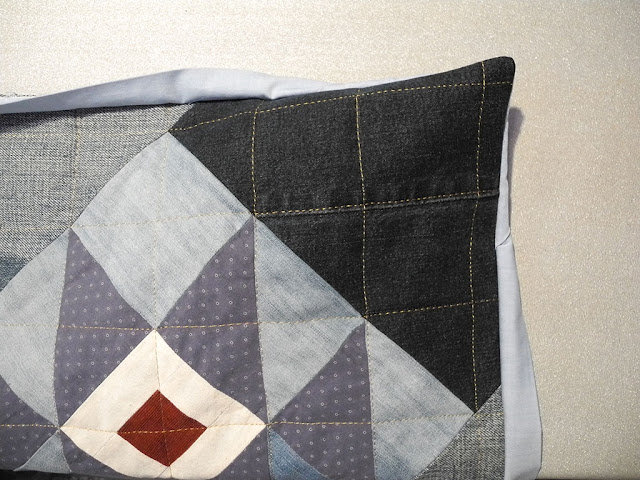
7.  I flipped the triangles to the back and, with a pen with the cap on, I carefully pushed all the corners out to give them a nice finish. I pressed the triangles in place. I pressed the strips away from the quilt. Then I folded, pressed them with steam to the back side of the quilt, having about 1/16″ of quilt front showing on the back.

abeeautifulday.blogspot.com-How to finish the quilt-The facing method


abeeautifulday.blogspot.com-How to finish the quilt-The facing method


9. Keeping the quilt with the top up, I stitched by machine all the way around at 7/8 of an inch away of the quilt edges (the facing strips are 1" wide) to secure the strips to the back of the quilt. If you want that the stitching to be invisible on the quilt top, stitch the strips to the back of the quilt by hand.

abeeautifulday.blogspot.com-How to finish the quilt-The facing method

abeeautifulday.blogspot.com-How to finish the quilt-The facing method


abeeautifulday.blogspot.com-Meeting with friends quilt pattern


abeeautifulday.blogspot.com-How to finish the quilt-The facing method


I hope you find this post helpful. 
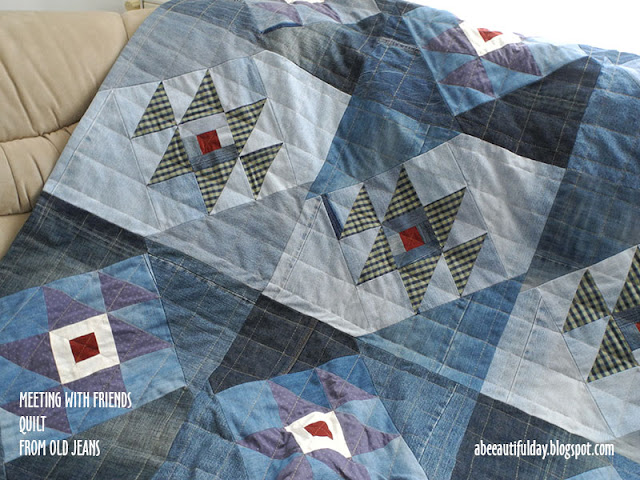
I used this method to finish a quilt made from old jeans and men's shirts, following the instructions of "Meeting with friends" quilt pattern.

abeeautifulday.blogspot.com-Meeting with friends quilt pattern


Have a beautiful sewing day, my dears!
Monday, 29 January 2024

How to use old jeans for sewing a quilt. Some useful tips to make your work easier


abeeautifulday.blogspot.com-How to use old jeans for sewing a quilt


I like denim. I’ve always liked to wear jeans, denim jackets, denim shirts or pinafore dresses. So, the desire to make a quilt from this kind of cloth came naturally. I asked my family and friends to give me jeans they no longer wore, and in time I managed to collect about 15-20 pairs.

In August 2023 I decided to use this pattern and started making the quilt using 10 pairs of jeans and two men's shirts. I finished it in January 2024 after taking about a three-month sewing break.

When it comes to sew quilts made of old jeans, the easiest design is the one of pieces measuring about 5" side and which allows the color shades to be randomly placed. The internet is full of incredible improvisational denim quilts that are a valuable source of inspiration. But in this post, I'll talk about the key aspects of my experience sewing a quilt with a structured pattern, which requires a certain sequence for color/shade variation and pieces with sides up to 10 inches.

abeeautifulday.blogspot.com-How to use old jeans for sewing a quilt

In a nut shell, I made a quilt composed of 30 blocks, measuring around 85" x 102" (215 cm x 250 cm) with the block size of 17"(43.5 cm), using 2 sets of fabrics.

The fabric for the quilt must be carefully chosen: too much stretch in jeans fabric gives a wonky shape in the block pieces. To better maintain their shape, I opted for minimal to no stretch jeans.

I used light, medium, and dark colored jeans for the block background. I cut the pieces from each color so I could get a light-to-dark shade effect. I also used two men's shirts as focus fabrics, a piece from another shirt for the blocks' central squares, and store-bought cotton fabric for backing and facing (rather than binding).

I washed and lightly ironed/pressed each pair of jeans, shirts and backing fabric. 


abeeautifulday.blogspot.com-How to use old jeans for sewing a quilt


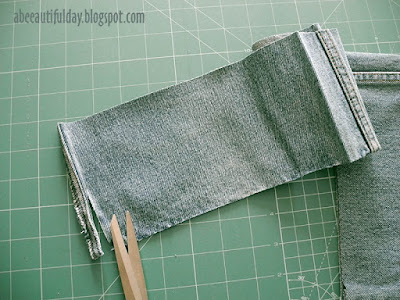
From each leg of the jeans I cut strips with the width on the size of the pieces that I was going to get from them. Then I worked in different ways with them:

- from one tube-like strips I cut the seams and then I cut the unfolded strips into necessary pieces.

abeeautifulday.blogspot.com-How to use old jeans for sewing a quilt


- on others, first I unstitched the seams to increase a little bit their length, I pressed, and then I cut them in pieces.

abeeautifulday.blogspot.com-How to use old jeans for sewing a quilt


abeeautifulday.blogspot.com-How to use old jeans for sewing a quilt


from another ones I cut two pieces at a time keeping the tube strip lying flat.

abeeautifulday.blogspot.com-How to use old jeans for sewing a quilt


For each block I joined the denim pieces with different degrees of discoloration aiming to achieve a certain design when assembling the blocks.


abeeautifulday.blogspot.com-How to use old jeans for sewing a quilt


abeeautifulday.blogspot.com-How to use old jeans for sewing a quilt

abeeautifulday.blogspot.com-How to use old jeans for sewing a quilt


To get more use out of the fabric I even used pieces that included seams but I carefully adjusted them to avoid bulk.

abeeautifulday.blogspot.com-How to use old jeans for sewing a quilt


abeeautifulday.blogspot.com-How to use old jeans for sewing a quilt


 I kept the seam out of the corners though, because much bulk in the corners makes the pieces too thick to sew.

abeeautifulday.blogspot.com-How to use old jeans for sewing a quilt


I pieced the quilt top using ¼" seams and I pressed them open. For thick denim I recommend ½" seams. Pressing is essential to obtain accurate seams and making your quilt lie flat.

On the stretch jeans areas I placed the iron on them and hold it still. To move it to a different part of the pieced block, I lifted it up and place it in a new spot.  Moving the iron around on the fabric can stretch it out.  Flat seams need a careful steam pressing.

abeeautifulday.blogspot.com-How to use old jeans for sewing a quilt


 I used regular polyester thread for piecing, machine embroidery thread for quilting, jeans needle for both piecing and quilting, and free motion foot for quilting. I chose the quilting thread to match the gold colored double stitching of the jeans. I quilted with straight stitching.

abeeautifulday.blogspot.com-How to use old jeans for sewing a quilt


abeeautifulday.blogspot.com-How to use old jeans for sewing a quilt


Instead of binding I chose faced binding. It was the best choice for this denim quilt: the edges came out nice, thin, straight and flat. I wrote a separate blog post about how I finished this quilt using The facing method.

abeeautifulday.blogspot.com-How to use old jeans for sewing a quilt


Because I only had a few pieces of each color shade, setting up them took a lot of attention in order to get repetitive sequences. Here is the result:

abeeautifulday.blogspot.com-How to use old jeans for sewing a quilt


abeeautifulday.blogspot.com-How to use old jeans for sewing a quilt


abeeautifulday.blogspot.com-How to use old jeans for sewing a quilt


Have a beautiful sewing day, my dears!


Saturday, 14 December 2019

When in doubt, make a bag! - Two tips for those who sew bags

Like many of you, I buy fabric sometimes just because I like it. Maybe for the color combination or its design, or for its texture ... or for all of these together.
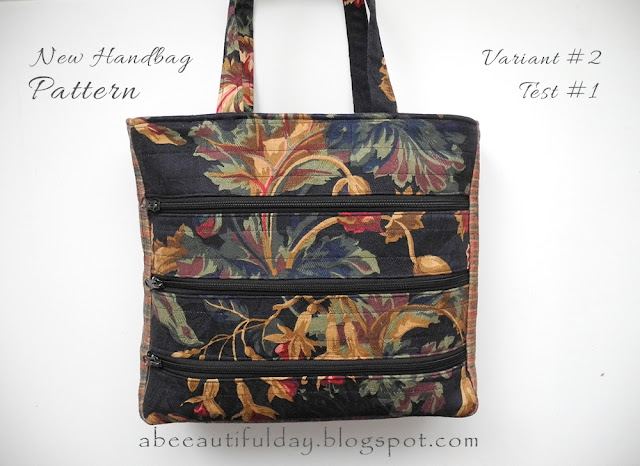
On such an occasion I bought a piece of fabric for home decor, only because I really liked the classic floral design lying on the dark background. The opportunity to put him to work came these days when I decided to use it for the 2nd variant of my unfinished bag pattern.

Two tips for those who sew bags - abeeautifulday.blogspot.com


First of all, it helped me to see what this bag model made of this type of fabric looks like, but also to test what happens when you sew zippers on such a fabric and how thick its pieces are sewn together.


Two tips for those who sew bags - abeeautifulday.blogspot.com

What I can share with you now from this experience is this:

When sewing home decor fabric, if you need a second fabric (for the gusset, my example) one good idea is that both fabrics have the same composition and thickness.
1. Same composition helps you to iron the bag pieces using the same temperature for all and, consequently, finish the work faster without melting accidents, if you use polyester blends.
2. Close or identical thickness helps you control the bag shape and it makes a lot easier to sew the bag pieces on the sewing machine.

Two tips for those who sew bags - abeeautifulday.blogspot.com


Now, back to writing the conclusions of this test for my no-name-yet bag pattern.

Two tips for those who sew bags - abeeautifulday.blogspot.com


Have a beautiful weekend, my dears!

Tuesday, 8 October 2019

Tips and tricks for sewing beautiful bags by spending clever your money -1

One of my dearest activities is sewing bags. All kind of bags: large, small, handbags, totes, shopping bags (oooh, how I love them!) and of course, pouches.
Even though it is impossible to find here where I live the perfect combination of fabric-lining-interfacing-batting-hardware for bag making, I try to gather the best ones from all kind o places: our local shops or online shops and overseas online shops. The last source I just mentioned would be my first choice if the transport prices would not have increased so much, that doubles the cost of the order.
But when you really want something, you find a way to do it. In my case this "something" is making bags. In order to get good quality materials at a reasonable price I spend a great amount of time finding the places that fit to my budget. I know from my own experience that you won't get a high quality product using low quality materials. No matter how much you want or do, you won't get a really beautiful and durable bag in time. If the fabric colors will bleed, the interfacing will detach or the thread will break after the bag will be worn only a few times, the feeling of working in vain will be overwhelming.
That's why a constant of my work is that all the time I look for methods to keep the quality as high as possible thinking at the same time on what I can spend less.
One of my tricks to do this is buying cotton curtains from thrift shops. These shops are treasure boxes where, with a bit of patience, I find beautiful curtains that may be use for the exterior bags, lining or shopping bags. One piece of curtain means a few yards of home decor fabric at a good price with the color wash out test already done.
I use them after I wash them (for hygienic purpose) especially for my mock-up while I'm working on a bag pattern, as I need a lot of tests and I want to preserve the new good fabrics for the final bag.
Sometimes I use them too when I want to make a bag "now", I don't have the matching new fabrics in my stash but I have a piece of a thrift shop curtain just good for it.  

Look at this bag.

abeeautifulday.blogspot.com - Tips and tricks for sewing beautiful bags by spending clever your money

It is the bag whose pattern I'm working now.

abeeautifulday.blogspot.com - Tips and tricks for sewing beautiful bags by spending clever your money

It is its first mock-up for which I used a piece of fabric from a cotton curtain bought from a thrift shop a long time ago, only because I loved the print and it was in a very good condition.

abeeautifulday.blogspot.com - Tips and tricks for sewing beautiful bags by spending clever your money

For straps I used leather - a premiere for me. On this occasion I learned to set rivets. I really liked this because this way I finished the bag much faster than if I had to make them from fabric and sew them on the bag. Not to mention how it looks a bag with leather straps!
No, my budget wasn't hurt by them. I will tell you why in the next episode of "Tips and tricks for sewing beautiful bags by spending clever your money".

Have a beautiful day, my dears!


Sunday, 21 August 2016

How to finish the quilt - The Self binding method

I decided to try different methods for finishing the quilts. 
Until now, the only way I did this was sewing a folded in half strip of fabric around the outside of the quilt.
This time, I used the one known as the self-binding method.

Tutorial-How to finish the quilt - The Self binding method-abeeautifulday.blogspot.com

Here are the steps I followed finishing my recent Forever Together quilt:

The quilt had the backing and batting wider than the top.

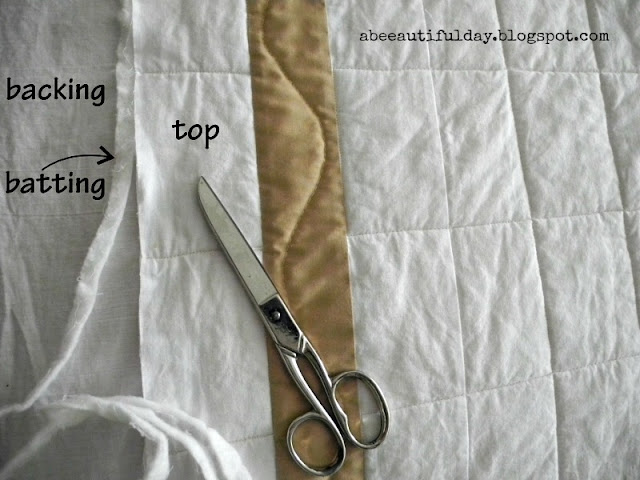
1. After I quilted it so that not overcome the edges of the quilt top,  I laid the quilt on the working table. Using the scissors, I trimmed first, the batting right to the edge of the top.

Tutorial-How to finish the quilt - The Self binding method-abeeautifulday.blogspot.com


2. Then I trimmed the backing, 1" wider than the quilt top all around.

Tutorial-How to finish the quilt - The Self binding method-abeeautifulday.blogspot.com

Tutorial-How to finish the quilt - The Self binding method-abeeautifulday.blogspot.com


3. On one side of the quilt, I began folding the edge of the backing in half so that the raw edge lines up with the edge of the quilt top.

Tutorial-How to finish the quilt - The Self binding method-abeeautifulday.blogspot.com


4. I folded it again so that overlapping the quilt top by ½ " and pinned in place.

Tutorial-How to finish the quilt - The Self binding method-abeeautifulday.blogspot.com


5. At the corner, I folded the backing edge like in the photo below.

Tutorial-How to finish the quilt - The Self binding method-abeeautifulday.blogspot.com


6. I continued on the next backing side, by folding it first in half ...

Tutorial-How to finish the quilt - The Self binding method-abeeautifulday.blogspot.com

...and then folding it again in half, overlapping the quilt top by ½ " so that obtaining a neat mitered corner. I pinned it in place and I continued all the way around the quilt until I had the whole backing folded and pinned. 

Tutorial-How to finish the quilt - The Self binding method-abeeautifulday.blogspot.com


7. I stitched close to the edge. 

Tutorial-How to finish the quilt - The Self binding method-abeeautifulday.blogspot.com


And that was all.

Tutorial-How to finish the quilt - The Self binding method-abeeautifulday.blogspot.com


Conclusions:

This method is good when: 
- you are sure that the quilt edges are straight because you can't square it up;  
- the backing fabric looks good next to the quilt top fabric, as it will be used for binding too; 
- you don't mind that the quilting stitches might be visible over the binding, on the back side of the quilt. In this regard, when quilting, backstitch when reaching the quilt top edges.

It is a quick and easy method to bind a quilt. You don't have to take out the quilt of the sewing machine, you don't have to join the ends of the binding.

I will use it again, for sure.


Have a beautiful sewing week, my dears!