Saturday 31 May 2014

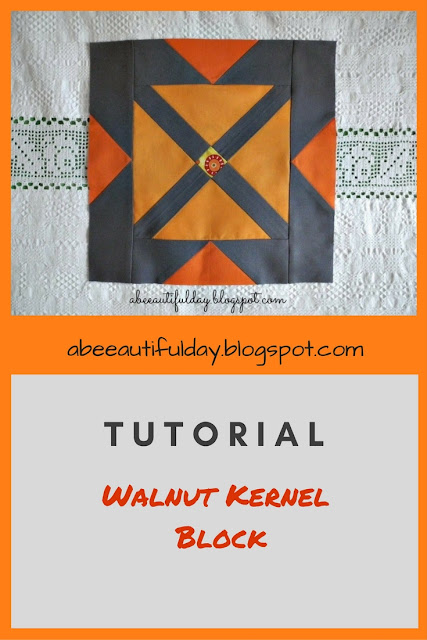
Walnut Kernel Block Tutorial

About a month ago I made this block, most of the time figuring out how to cut and stitch its units. As you may see, my inspiration is still in the needle points world.
After I made a quick table runner from three test-blocks I set the problem aside because I had other deadlines on the horizon.
These days I brought it back. This second attempt to work on this patchwork block has been occasioned by the participation in a Round Robin which just started these days.
I made some research work to gather information about similar blocks. I found one version of it in Judy Hopkins book, named "Whirling Five Patch". But I didn't want this setting. I wanted the setting of the original needlepoint from Basarabia, which might be included in the traditional motif known as "Walnut Kernel".
But I was again pushed from the back by the time. I stopped searching and started to do it how I thought it was right. One thing was sure: the name of this block.
If somewhere in the World there is a tween brother of my block, I'll be happy to meet the author!

So today I share with you the tutorial I made for sewing it.
The May newsletter which is about to be sent has as main subject a few free quilt designs I made based on this block.
So, here it is

Walnut Kernel Block Tutorial - abeeautifulday.blogspot.com

Walnut Kernel Block Tutorial - abeeautifulday.blogspot.com


Cutting


Walnut Kernel Block Tutorial - abeeautifulday.blogspot.com


Instructions

Seam allowances are 1.4" unless otherwise stated.
 

1. Cut the B square in half diagonally. We have 2 Half Square Triangles (HST).

Walnut Kernel Block Tutorial - abeeautifulday.blogspot.com


2. Center the longest side of one HST over the D strip, right sides together.
Sew them together.
Handle this side of the HST carefully to avoid stretching it out of shape. It is a bias cut.
Press toward the strip.

Walnut Kernel Block Tutorial - abeeautifulday.blogspot.com


3. Center the longest side of the other HST over the other edge of the strip,
right sides together.
Sew them together. Press toward the strip.

Walnut Kernel Block Tutorial - abeeautifulday.blogspot.com


4. Sew the 1 ½ " A square between the two E rectangles.
Press toward the rectangles. Set the pieced strip aside.

Walnut Kernel Block Tutorial - abeeautifulday.blogspot.com


5. Cut the resulting block in half on the other diagonal.
We have two HSTs again.
Walnut Kernel Block Tutorial - abeeautifulday.blogspot.com


6. Sew the strip containing the yellow square between the two HST.
Press toward the pieced strip.
Walnut Kernel Block Tutorial - abeeautifulday.blogspot.com


7. Trim the excess. Take care to have the meeting points of the  block's perpendicular
sides placed in the middle of the corresponding strips ends (see the red arrow).

Walnut Kernel Block Tutorial - abeeautifulday.blogspot.com


If you worked accurately the central block should measure 7" x 7" (seam allowance included).
Set it aside.


8. Place one F piece vertically over the left half of one C piece, right sides together.

Walnut Kernel Block Tutorial - abeeautifulday.blogspot.com
On C piece draw or fold and crease one diagonal line from up left to down right and sew together F+C pieces. Cut the excess to 1/4 " seam allowance.
Press toward F piece.


9. Take another F piece and place it on the right half of the pieced unit, right sides together.
Repeat Step 8 changing the direction of the diagonal.

Walnut Kernel Block Tutorial - abeeautifulday.blogspot.com


Walnut Kernel Block Tutorial - abeeautifulday.blogspot.com


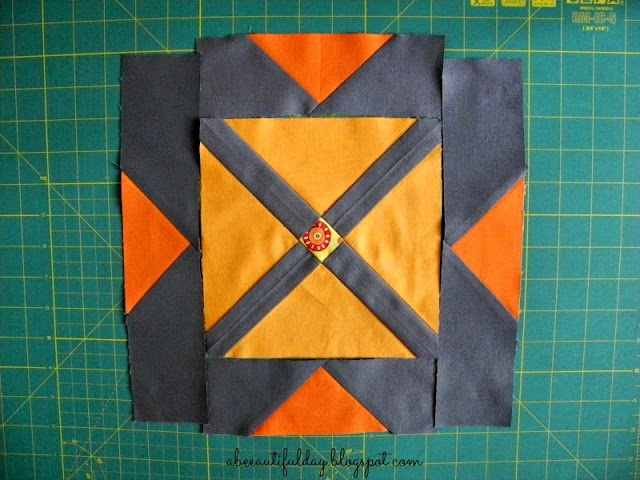
10. Make one more F+C+F unit and two G+C+G units.
Walnut Kernel Block Tutorial - abeeautifulday.blogspot.com
The four pieced units in place, before sewing them to the central block.


After trimming them you should have two short pieced units measuring 2 1/4" x 7 1/2" and two long pieced units measuring 2 1/4" x 11".


11. Take the central block and fold it in half. Finger press to leave creases
in the middle of each side.

Walnut Kernel Block Tutorial - abeeautifulday.blogspot.com


 Center the two F+C+F units on the block, right sides together and sew them to the top and bottom edges.


Walnut Kernel Block Tutorial - abeeautifulday.blogspot.com


Walnut Kernel Block Tutorial - abeeautifulday.blogspot.com


Press the seam allowances outward.
Trim the excess.


Do the same with the G+C+G units for the left and right edges.
Press the final block.
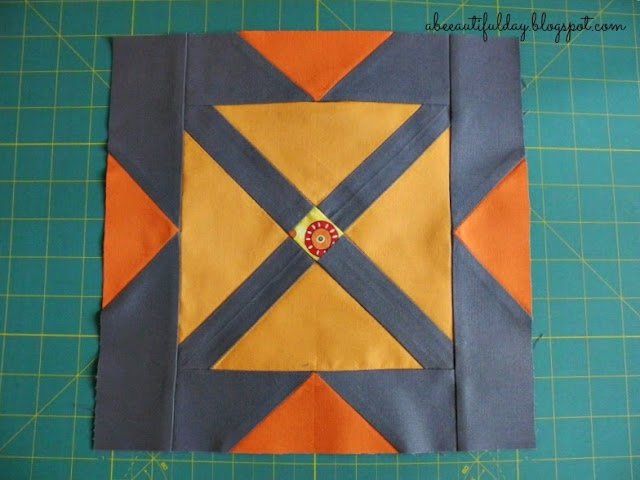
The finished block should measure 11" (seam allowance included).
Walnut Kernel Block Tutorial - abeeautifulday.blogspot.com
The finished block with the pieced border added


It's important to keep the accuracy of the cutting and sewing in order to not alter the design.

Tips 

It's possible that at your first attempt to come to a smaller central block, trying to get the middle point of the diagonal in the trimming step. In this case, you will have to adjust the exterior pieced units length, after sewing them to the central block. In consequence, your final block will get smaller than 11".
In this case, you should verify if the exterior triangles long sides measure 1 1/2" less than the interior triangles long sides.
If they have about the same length, take the ruler and do these:
- measure one interior triangle long side; from this number subtract 1 1/2" and you have the exterior triangle long side length.
- place the ruler on the block and keeping it parallel to the block exterior side, glide it inward until you reach the desired length of the exterior triangle side. Cut along the ruler. Do the same with the other three sides.
This way, even the block is smaller than it should be, the design is not altered.

I hope this tutorial is intelligible and useful.


Have a beautiful weekend!

I am linking to Linky Tuesday.

Wednesday 21 May 2014

The Butterflies Bag

The test-bags saga continues.
Today character is the Butterflies Bag.


I used two lovely fabrics with a lot of purple print: Cocoon for Free Spirit from Westminster Fibers and Little Dot from Europe.


As with the other bags, I used batting and I quilted the bag body.
The quilted bags attract me almost every time. They have a special look. They are unique each and every one because you can't quilt identical designs. I mean free motion quilting. But it's challenging to find the balance, to not overwhelm the fabric with to much stitching or to lay out the quilting design that enrich the bag shape and not just fill an empty space.
In this bag I used  thread of two colors for those simple waving lines.       
I'm very pleased how it turned out the exterior zippered pocket and I like more and more the straps with square rings.


I chose another way to hide the magnetic button and I tested one add for the bottom.


And yes, I made this bag thinking at a dear lady. Because I will give this test-bag to her as present.
I only have to make it a matching pouch.

Now,  let's see what fabrics to choose for the next bag!

Have a beautiful day!

I am linking to Linky Tuesday 
                      Finish it up Friday
                      Fabric frenzy Friday

Sunday 18 May 2014

Giveaway Day Winners

I am so excited that so many of you took part in my first Giveaway Day!
I have read all your comments and I confess it was hard to decide who will be the 2 winners.
That's why the conclusion was to raise their number up to 4.
Nice surprise, isn't it?


So, the 4 winners of the Country Home Pillow Cover pattern are:
Ella
Swedish Scrapper
Texas Quilting Gal
WhoMom

I will send you an email and after your answers I will send you the pattern. I do so to be sure that I have your correct email address and my pattern will reach you.

Thank you all for stopping by and I hope to see you again here!
It's easy to follow my blog using this tools, to see what will come next:

Subscribe to My Newsletter

Once a month - a free design or template for your sewing  projects!


Follow on Bloglovin

Enjoy what ever you have on your work table now!
Thank you, again! I was very glad to have you here!

Have a beautiful day, my dears!

Monday 12 May 2014

Giveaway Day

The giveaway is closed now.
Thank you for your participation!


I am participating for the first time in the Sew Mama Sew Giveaway Day.
I love all is related to fabrics and threads and instinctively, almost every time I see something made with them I wonder: How could I do this thing otherwise?
So, I began to create patterns. My first one was released a few month ago and I will give it away to two of you.

You may find information about it here.

I have a question for you: What do you prefer: piecing or quilting?
If you want to participate in the draw, leave your answer at the end of this post.

I will choose randomly the 2 winners.

Giveaway is open until May 16.


If you want to come back here, on my blog,  please use this easy reminders:


Subscribe to My Newsletter


Follow on Bloglovin


Have a beautiful day!

Edited to add:  if you are a noreply-blogger and don't want to make public your email address in the comment, please send me an email announcing me that you are one of the Giveaway Day participants.

Thank you! 

The giveaway is closed now.
Thank you for your participation!


Friday 9 May 2014

Playing with my bag

I made another bag.  The others are this and this.
I wanted to see how it looks with a geometric print. I found such fabric in a little store in my town and I gave it a try.


I used polyester batting and I quilted the bag exterior on it. I used square rings for straps.


The bag is roomy, has inner pockets and an exterior one on one side, but as it will be a gift, I will make an assorted pouch for all those little things  that would be scattered everywhere in it.


I started to think of a name for it. For now I found none but until I will done writing the pattern is enough time to find one.


Have a beautiful weekend!

I'm linking to Finished up Friday.
                    TGIFF

Wednesday 7 May 2014

My Garden May Palettes

We just returned from a lovely trip to our country home. We had such a great time. Although the first days where a bit grey and rainy, we had a wonderful time. 
Back home, I spent some time on the website play-crafts.com to compose the color palette of a few photos taken these days in my garden.


I really love this site. 
A very useful application I found here is Palette Builder - you upload your photo and instantly you have its palette.


You can add, change or delete colors from the palette but the best thing is on the right side of your photo: the application makes 3 matching lists of your color palette: one for Kona Cottons, one for Hex Values and one for Aurifil Threads.  You can save the photos with their palettes and/or share them. Brilliant!
No registration, passwords or things like these. It's simple and fast.
I find it very useful and fun. 
From now on the chain of My Quilting Hopes it's sooo short:  
photo - palette - money - money - money.... - Kona Cotton and/or Aurifil Threads order 
:)
In the meantime I saved one of my garden May Palettes with its three matching lists, for my wishlist :


I hope you will find this online tool helpful, too.

Have a beautiful day!


P.S. This isn't a payed post. I really think this people made a very useful job.


Thursday 1 May 2014

Reading and Gardening Break

For several days I'll be gone. It will be a little vacation I will spend in the countryside. We have so much to do there. In the garden we have the most work.
Today, while I was packing for our trip, the postman brought me a book I ordered two weeks ago. I only browse it, but I saw I was right to buy it.


It's a precious source for studying pieced blocks and learning their names but most of all it provides clear instructions in six different sizes for each block.


The book was printed in 2008 and was designed for the quilters who love both old patterns and modern techniques.


Unfortunately, Judy Hopkins is no longer living.
I am grateful to her because I have on hand such valuable reference book.
  

See you next week!
Have a beautiful beginning of May!