Showing posts with label cushion. Show all posts

Monday, 3 July 2017

I Love My Doll applique pillow cover quilt pattern is ready!


I just launched the pattern of a cute little quilt:
I love my doll!


Its dimensions -  16" x 16 " -  are ideal for a pillow case or a wall hanging for a lovely little girl.  
The pattern includes instructions for a pillow case.
The main technique is the raw edge applique - simple and fast. One border added to the doll block and the quilt top is ready. Oh, I forgot to tell you that the doll name is Emma.
I told you something about her and her sister a while ago when I introduced them to you.


The pattern provides:
- instructions for preparing the applique pieces
- instructions for piecing the quilt top
- instructions for preparing one color and two color prairie points
- suggestions for securing the applique edges and quilting
- instructions for finishing the quilt 
- instructions for assembling the pillow cover
- layout suggestions
- ready to print templates

There are 40 illustrations and diagrams gathered in 16 pages.
The measurements are in inches.

You need:
Fabrics 
- one fat quarter or 18" x 18" piece of fabric for border; 
- one fat quarter or 18" x 18" piece of fabric for backing
- one fat quarter or 16" x 22" piece of fabric for the pillow back
- a few pieces of fabric for the appliqued doll 
- 2 ½ " x 80" for binding
Batting 
- 18 " x 18" 
Fusible web - about 8 " x 18" or temporary adhesive spray or fabric glue that maintains its qualities after pressing.
Water soluble pen, red and black permanent markers
Scissors, coordinated thread
Open – toe foot for securing the applique edges


In addition to this pattern, I'm working on the templates of a few friends of Emma. Girls and boys. You will have the possibility to add one by one a collection of applique dolls for your kid's room or to choose the ones they like most.
Emma's friends will be available as templates only. You will use the instructions of Emma pattern, launched today, I love my doll!
Emma's friends individual templates will be listed in my Etsy pattern shop, as I will finish them.

I love my doll pattern is here.
I hope you will enjoy it!

Have a beautiful day, my dears!

Linking to Finish it up Friday!


Sunday, 2 April 2017

Something new to sew - Quilted Pillow Cover pattern release

Do you like applique?
I do. I always did.
It was just a matter of time to design my own pattern.
And here it is:


It's so easy to make, so quick to complete!

And sooo beeeautiful, isn't it?


The pieces are simple and symmetrical. Easy to cut, easy to fuse, easy to stitch down.


I know, it sounds like a shameless self-promotion, but actually, these are the grounds that had driven to writing the pattern.


You need only a few hours of work (looking more like a child's play), two fat quarters and a few fabric scraps and strips.


You might use this design also for a cute table topper or even for a lovely quilt.
One Happy Flowers pillow, table topper or wall quilt and you will feel like Spring and Summer are forever in your home.

I thought the pattern as a simple and friendly guide, providing
- a lot of pictures
- instructions for fusing, stitching, piecing, washing and for assembling the pillow cover
- all the necessary templates
- suggestions for layout variation

And to smooth its way into the world,

During 2 - 4 April 2017

 I will offer my 

Happy Flower Quilted Pillow Cover 

at a reduced price!

You are welcome in my shop!


Have a beautiful week, my dears! 


Friday, 22 April 2016

My dear doll - two pillows for two little girls

I finished the mix-of-techniques project started about ten days ago.

I  have drawn the two dolls having in mind that they will become appliques: with simple shapes, minimum details and above all, not too small pieces.

At the same time, I was thinking about what kind of stitches I will use for securing the edges in an esthetic and functional way - they will be on usable objects and will be washed many times.


But then another problem came up: to use one color of thread or many? As you may see, I chose many. I kept the same thread in the bobbin (a simple thread I used for piecing), so I changed only the upper thread and the whole thing was not so time consuming. Yes, it is not the first time I broke the "use-the-same-quality/color-thread-on-both-places-of-your-sewing-machine" rule. Usually my sewing machine approves this.
I stitched first all requiring the same color of thread and then I moved to those needing another color, and so on.
Besides doll faces elements and names, I did all the other stitches having the quilt top on the batting and backing, as I wanted the dolls components to detach from the background.
For the faces and names I digitized the drawings and gave the stitching job to my embroidery machine. But I'm sure they give no problem even for a beginner in hand embroidery.


The patchwork part shows its simplest layouts: the green frames added to the central dolls panels and a few pieced patches for the two colors-prairie points.
The quilting includes the stitches of the appliqued dolls and the straight lines stitched throughout the frame. I used both the free motion foot (for the hair, hearts and background) and the walking foot.

While writing these things I realized that it is more complicated to describe in words than do "My dear doll" mix-of-techniques-project.


I keep working on this pattern.
Maybe someday somebody loving both embroidery and quilts will like to have it and make it.

Have a beautiful day, my dears!

I'm linking to Finish it up Friday!


Friday, 11 March 2016

Urban Folk quilt - gift idea for a man

 A few things to polish and verify for the Urban Folk quilt:


Here is another test. A pillow cover. I showed you just a little of it some time ago.


I gave it already as gift to a very special man. Actually I selected the fabrics having him in my mind.
In a nut shell: upcycled denim, scraps, strings, hand dyed fabric, quilting fabrics.


About the quilting style: I like these waving and straight lines flowing over the simple patchwork. For the time being I don't see an elaborate quilting design for it. Who knows what I will think about this in the future? We will see.
Creating is a never ending story, isn't it?


Have a beautiful day!

I'm linking to Finish it up Friday!


Friday, 6 March 2015

A new pillow and a little tutorial for zippered closure

I made this pillow cover as a gift for a friend.

Pillow Cover Zippered Closure Tutorial-abeeautifulday.blogspot.com

He has two hobbies: photography and sport.

Pillow Cover Zippered Closure Tutorial-abeeautifulday.blogspot.com

I made a few designs and after a long pondering, I decided that this one is the winner.


Pillow Cover Zippered Closure Tutorial-abeeautifulday.blogspot.com

I tried to make the pillow closer using the fastest method I knew. But necessarily with zipper.

Pillow Cover Zippered Closure Tutorial-abeeautifulday.blogspot.com

I liked how the things went, so I wrote this

Pillow Cover Zippered Closure Tutorial-abeeautifulday.blogspot.com


Pillow Cover Zippered Closure Tutorial-abeeautifulday.blogspot.com

Place a fabric strip (wider with at least 2" than the zipper) onto the pillow back, right sides together. Pin them into position.
Decide the length of the pillow opening and draw a rectangle as long and 0.5" width. Draw also a central line like in the photo above.


Pillow Cover Zippered Closure Tutorial-abeeautifulday.blogspot.com


Stitch only along the rectangle line and cut along the entire length of the central line through both layers of fabrics. Also cut along the V-shapes. Avoid cutting into stitching of the outer rectangle.

Pillow Cover Zippered Closure Tutorial-abeeautifulday.blogspot.com


Pull the strip fabric through the rectangular hole to the wrong side of the pillow back.

Pillow Cover Zippered Closure Tutorial-abeeautifulday.blogspot.com
 Press the strip flat and stitch the zip.

Pillow Cover Zippered Closure Tutorial-abeeautifulday.blogspot.com

 If you used a longer zipper, cut the excess (see the blue dotted line).

Pillow Cover Zippered Closure Tutorial-abeeautifulday.blogspot.com

Done!

Note
To prevent fraying you might add a simple zig-zag stitch on the strip edges before use it.

All is well when ends well, right?


Have a beautiful day, my dears!


Friday, 27 February 2015

New Kid in town

Here is the guy from my previous post.

Another collaboration with Romanian artist Lenus Dragulelei
He says: 
Good bye Winter! Welcome Spring! 

A cheerful pillow perfect for lifting the spirit, isn't it? 


Have a beautiful Spring, my dears!

Saturday, 7 February 2015

In between


After finishing a project I can't start the next one without reorganizing things around me. And above all in my head. Almost always between two projects one of my favorite method to clear my mind is a short session of quilting. Trying new shapes, new patterns. Looking to match different colors of threads with different colors and patterns of fabrics.

This time my quilting pause has one more finality: I brought together a few scraps of good and cheap fabrics I had on hand and I made two different tops for two 16" x 16" pillow covers for our bed.


I like quilting but I'm not good at it. I don't have patience to stitch over and over again the same design  following strictly the same paths. Above all I can't stitch perfect rounded or geometrical shapes. I'm not the kind of person looking and loving to do this.


I'm attracted by the free hand quilting designs. Even when I stitch repeated circles or spirals, I'm not looking to get the same shape or size. Nor perfectly straight lines, or equal distances between them...


All I want is that my quilting design to compliment the background.
And this is not easy. Not easy at all.


But I keep trying to think the final object I make, even if it is a humble simple one, as a whole composition, regarding both his aspect and usefulness and to treat quilting as one of its elements not an end in itself. And when I don't forget to think like this I find easier the answer at the well known question " How I will quilt this?"


So, let's practice some quilting!

Have a beautiful day, my dears!


Thursday, 29 January 2015

Love Thoughts - Valentine Embroidered Patchwork Pillow - Free Pattern


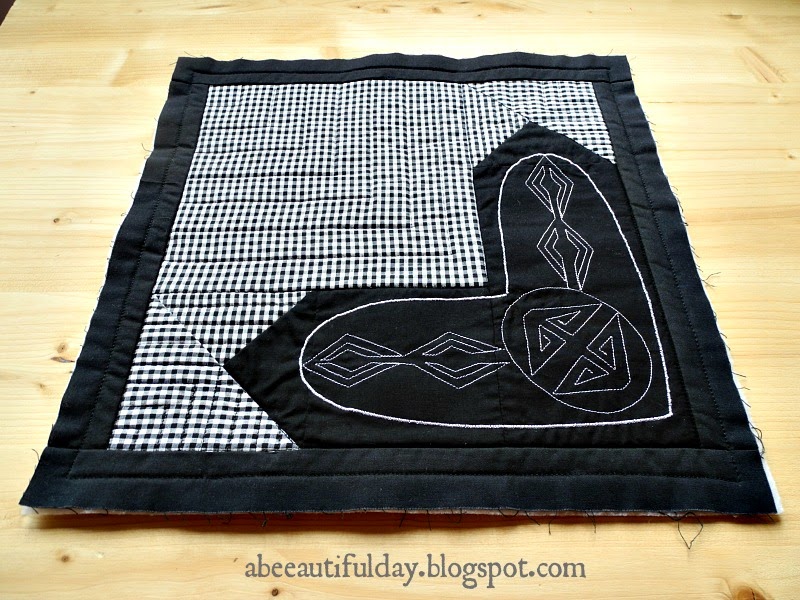
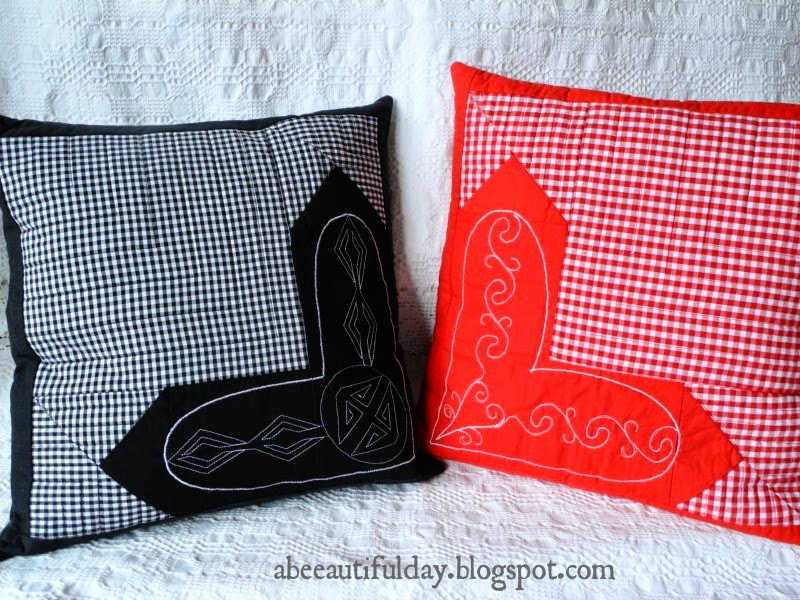
It's the end of January and I have spent about half of it pondering, drawing and sewing for this Valentine themed project. It came out one Heart Quilt Block and two Embroidery Designs: one for Her and one for Him.


 Trying to suggest rather than explicitly show, I decorated "his" heart with straight lines and "her" heart with curved lines. My favorite source of inspiration - as always, Romanian needlepoint stitches.

An important mention: it is a quick project. It takes just a few hours to sew it, including the embroidered heart.
I equally thought about embroiderers and quilters: I made the two designs applicable both for embroideries and quilting designs. As you will see below, they are forgiving designs.They don't require perfection.

If you want to add a fresh look to your Valentine gifts, give it a try!

Please respect my work - Note that this pattern and designs are for individual use only. Not for resale. If you show them on your blog, site, Pinterest, Flickr..., don't forget to add the link back here, on my blog.


Valentine Embroidered Patchwork Pillow-Tutorial-abeeautifulday.blogspot.com


Finished size: 14" x 14"
All seam allowances are ¼".
Press the seam allowances toward the dark fabric unless otherwise stated.
Read through all instructions before you begin.

Materials requirements

For the pillow front:
-Fabric A (mine is gingham): ¼ yard
-Fabric B (mine is solid): 1/4 yard
-Batting: 15" x 15"
-Cutaway or Tear-away stabilizer: 9" x 9" (for embroidery)

For the pillow back:
-Fabric for 14 1/2" square, buttons or zipper, according to your preferences.

Cutting Instructions

 Fabric A

Cut one piece of each:

Valentine Embroidered Patchwork Pillow-Tutorial-abeeautifulday.blogspot.com


 Fabric B
Cut one piece of each:

Valentine Embroidered Patchwork Pillow-Tutorial-abeeautifulday.blogspot.com


Sewing Instructions

Use illustrations bellow as a layout guide:

Valentine Embroidered Patchwork Pillow-Tutorial-abeeautifulday.blogspot.com


8) Add the border

Valentine Embroidered Patchwork Pillow-Tutorial-abeeautifulday.blogspot.com


9) Print the embroidery design

For each of the two designs follow the same steps:
Right-click on the image. Select "Save as..." and save it on your computer. Print it in the original size. Measure the 1" square to verify if the scale is correct. The drawing fits on a single page. It doesn't matter if the print is a bit smaller or bigger as long the heart outline fits the background heart pieced block.

Valentine Embroidered Patchwork Pillow-Tutorial-abeeautifulday.blogspot.com
"His" Embroidery design
Valentine Embroidered Patchwork Pillow-Tutorial-abeeautifulday.blogspot.com
"Hers" Embroidery design


10) Transfer the design onto the pillow front using a water-soluble pen.

Valentine Embroidered Patchwork Pillow-Tutorial-abeeautifulday.blogspot.com

11) Add the embroidery  - optional step!
To prepare to embroider spray a piece of stabilizer with temporary adhesive on the wrong side of the pillow front and smooth the fabric on top. You don't need a hoop.

For "His" design I used the applique foot that gave me a large field of visibility.
I chose two standard stitches of the sewing machine: satin stitch for the outline and straight stitch for the inside design.

Valentine Embroidered Patchwork Pillow-Tutorial-abeeautifulday.blogspot.com


For "Hers" design I used the applique foot for the outline and the free motion foot for the inside design.

Valentine Embroidered Patchwork Pillow-Tutorial-abeeautifulday.blogspot.com

Once the design is finished trim away the excess stabilizer on the back.

Valentine Embroidered Patchwork Pillow-Tutorial-abeeautifulday.blogspot.com

12) Quilting the pillow front

If you stitched the embroidery - Center the pillow front with its wrong side on the piece of batting. You don't need backing. Quilt the rest of the pillow front as desired.

If you did not embroider  - stitch through both layers quilting first the traced heart pattern. Quilt the rest of the pillow front as desired.

Valentine Embroidered Patchwork Pillow-Tutorial-abeeautifulday.blogspot.com

Wash the pillow front to get rid of pen traces.
While it dries prepare the pillow back.
Join the front and the back together.
Done!

Valentine Embroidered Patchwork Pillow-Tutorial-abeeautifulday.blogspot.com


Valentine Embroidered Patchwork Pillow-Tutorial-abeeautifulday.blogspot.com

Valentine Embroidered Patchwork Pillow-Tutorial-abeeautifulday.blogspot.com

Enjoy my pattern and designs!
I would be very happy to see they are useful.

Short note for my newsletter subscribers
As I promised at the beginning of 2015, I will send you a monthly illustrated calendar to use it by printing or save it on your computer.
In the next newsletter (which you will receive in a few hours) I will send you the February free calendar. I hope it will bring a bit of joy in these grey winter days!

Have a beautiful day, my dears!

I am linking to Finish it up Friday!