Showing posts with label pouch. Show all posts

Tuesday, 14 February 2017

Happy Valentines day!

Hello, my friends!
I hope you have a day full of love!

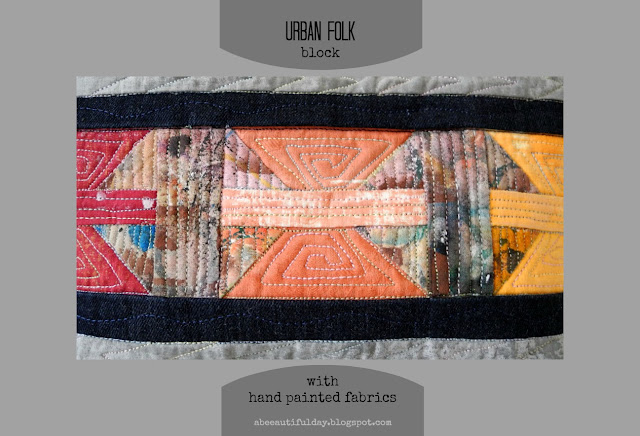
In this special day, I want to share with you one little project for which I used my Urban Folk block, a few little pieces from my hand painted fabrics and a few pieces of denim.
I chose this pattern because it has let me to suggests the close bound between two people loving each other only by the way of combining the fabrics.


I kept the idea also when I quilted it.


 And finally, look what it came out:


The pouch back:


It was a quick and cute project.
Urban Folk block pattern is so versatile and easy to do, that only by scale it and place it between a few strips of fabrics you might use it not only for making lovely pillows
but for modern quilts


 place mats


 and as you might see in this post, for special pouches or bags.

If you like it and want to use it in your future projects, it waits for you here.

For now, I have a gift for you:
one free quilting design for all of you, my dear quilting enthusiasts.


Right-click on the image and chose "Save image as...". Print it at the needed size and transfer the design on the quilt top.You might use one color thread or several colors of thread.

Look how it might look the quilting by repeating and shifting the  Joined Petals design.


Please respect my work and note that the design is for your personal use only - not for resale or redistribution.

Thank you!


Have a beautiful Valentines Day!

I'm linking to Finish it up Friday.


Wednesday, 18 January 2017

One mini quilt = one pouch -- # 3

Today is the turn of the third mini quilt to welcome you.
If you want to see the little stories of the first two mini quilts of the series, please go here and here.

Here is my
Happy Flowers mini quilt:


I used painted fabrics for flowers, stems and leaves and commercial fabrics for the background.
I chose this free motion quilting to give some texture to the background and I used a narrow zig-zag stitch to secure the appliqued flowers edges.

Now look at its transformation:


A simple beautiful pouch.

On the pouch back I kept the same way of quilting as for the other two pouches: alternating a few lines with unequal zig-zag stitches.


It was another quick and fun project I am sure will have some followers.

The Mini quilts becoming pouches series continue. From time to time I will bring some of them here, on the blog.

Linked to Finish it up Friday!

Have a beautiful day, my dears!


Tuesday, 10 January 2017

One mini quilt = one pouch -- # 2

In the last days of 2016, I made a few pouches. On that occasion, I inaugurate a new series of posts on the blog about mini quilts. What's the connection between pouches and mini quilts?  Well, at the beginning, each of these pouches was a mini quilt.
 If you want to see the first one, please go here.
Today is the turn of the second mini quilt to be presented.
I named it Serenity.


As you may see, I improvised a simple patchwork design, sewing a few strips and scraps of painted fabrics from my stash. I wanted that the quilting to contribute to the calm feeling inspired by the soft color combination.


The pouch made from it is so delicate!


On the pouch back I played alternating a few lines with unequal zig-zag stitches.
It was another quick project I so loved to do. 

Have a beautiful day, my dears!

Thursday, 22 December 2016

One mini quilt = one pouch -- # 1

I made a few pouches for one of my friends. She wants to give them as Christmas presents.
Luckily the design was my choice.

I decided to make for the fronts of three of them three different mini quilts. But the fabrics from my stash have not encouraged at all my imagination, so I painted a few pieces of fabric and I started working.

Here is #1
I named it Surprise Mini quilt


I liked very much improvising this log cabin design using pieces of commercial fabrics and painted fabrics.The quilting is simple just to calm down a little the bright composition.

On the pouch back I inserted a line of zig-zag stitches, playing just a little bit with the zig-zag width.


  I have put all together and the pouch was ready in no time.


 Have a beautiful day, my dears!

Thursday, 4 September 2014

Colibri - another little bag

The second cross-body little bag is ready.
Colibri is a Hummingbird group. When I was thinking how I will name the new bag, the first thing that came into my head looking at it, was this tiny bird. 


In the previous post I showed you the first little bag.
I changed its shape and I quilted it following the fabric print, doodling on the go.


How fun it is to make a bag having only 7" x 8"! It can be done in a few hours.
I simple love this crazy printed fabric! I made out this little bags more for the sake of it.

The same bag, the other side.


I made it two compartments, one of them being closed with Velcro.

Let's see what will come up!


Have a beautiful day, my dears!

I am linking to Finish it up Friday!
                      Can I Get a Whoop Whoop?

Tuesday, 2 September 2014

A Little Bag

I had an orphan block -"Three and Six" named by Judy Hopkins - and I didn't knew if I will continue to make a quilt or not.


In fact I liked this printed fabric I bought from a local shop and I made a little test to see how it combines with my Kona solids scraps.
And because my brain is still in the "bag period", I used it for a little bag.
It turned out a pouch with cross-body strap, like I wanted.

Front


Back


I think I will make a few more such little pouch-bags. The perfect projects for the active breaks.


Have a beautiful September, my dears!


I am linking to Linky Tuesday .


Thursday, 5 June 2014

Happy pouches for summer travel bags

Last days, among other things, I managed to sew a few pouches for my friends travel bags.


For two of them I used again one of Geta's patterns but with some twists: rounded corners and a squarish shape.


The third one has two different sides:


I made all three taller than usual. One reason was to make them roomy, as they are used especially for toiletry. Another reason was to break out the usual more or less rectangular shape of such kind of pouches.

The weekend is here, but it's rainy and cold. 
Let's hope that things will be better till Monday and I will have real reasons to continue to sew summer things!

Have a beautiful weekend!

Wednesday, 23 April 2014

....and a present for myself

I spent the week before Easter sewing a few presents but I managed somehow to make a small one for myself.


I used one of Geta Grama's patterns. As always she gave such detailed instructions as in a few hours I made this nested pouch using only some little pieces of fabrics and 2 zippers.


Now I have a roomy pouch to get all I need for sewing when I will go to my country home.

I love it!

Have a beautiful day, my dears!

Wednesday, 30 January 2013

Quilt - As - You - Go Pouch Tutorial (in Romanian)


Quilt-As-You-Go Pouch Tutorial - abeeautifulday.blogspot.com


Quilt-As-You-Go Pouch Tutorial - abeeautifulday.blogspot.com


Fiul meu are un GPS fara husa, pe care il foloseste din cand in cand, atunci cand pleaca din oras. Ca sa nu se zgarie si sa nu se prafuiasca, m-a rugat sa-i fac o husa, ceva...in care sa-l puna. Cand aveam timp, nu aveam chef, cand aveam chef, nu aveam timp....Norocul lui a fost ca intr-o zi, am vrut sa fac o pauza activa si sa ma joc putin "quilting-as-you-go", asa ca, cele doua (timpul si cheful) s-au intalnit miraculos si in cateva ore, portofelasul (ca nu are forma de husa) a fost gata.

1. Am masurat GPS-ul si am taiat  pentru fiecare din cele doua fete, cate un dreptunghi din materialul ce va fi in interiorul lui si un dreptunghi din vatelina. Panza a fost taiata cu o rezerva de circa 0.75"(2 cm) fata de dimensiunea finala, iar vatelina, la dimensiunea finala, ca sa nu ingroase prea mult portiunea care va fi cusuta la masina, mai tarziu, la asamblare. Panzei i-am lasat o rezerva mai mare decat aveam nevoie, pentru ca in general, matlasarea reduce dimensiunile initiale.
Am fixat vatelina pe panza (rosie la mine) cu adeziv temporar.

Quilt-As-You-Go Pouch Tutorial - abeeautifulday.blogspot.com

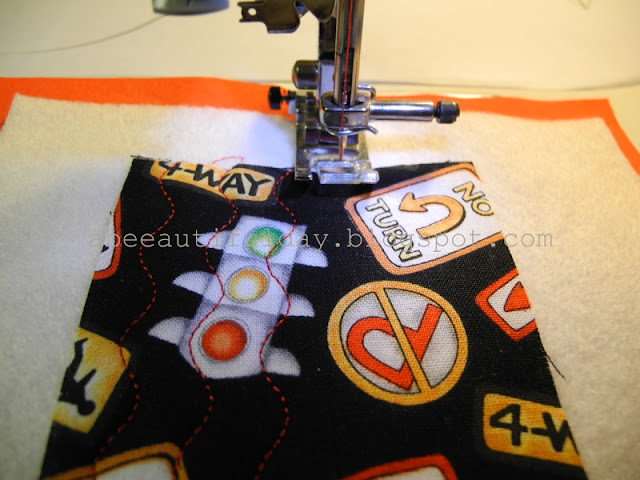
2. Am inceput sa asez peticutele de materiale pentru patchwork, unul cate unul, "pe vazute", adica fara sa urmez un model geometric strict.
Primul peticut a fost fixat de vatelina direct prin quiltuire.

Quilt-As-You-Go Pouch Tutorial - abeeautifulday.blogspot.com

Dupa cum vedeti, n-a fost nevoie sa schimb piciorusul masinii de cusut, pentru ca vatelina nu a fost pufoasa.

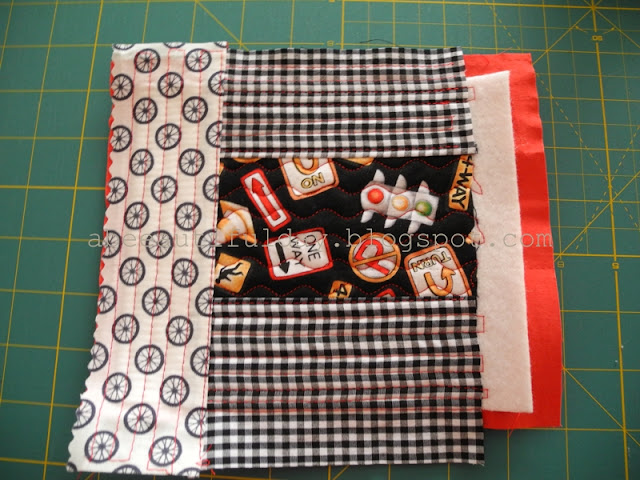
3. Fiecare peticut (sau grup de peticute asamblate separat) a fost asezat fata la fata, margine la margine, peste ansamblul fixat deja pe vatelina si a fost tighelit cu rezerva de 0.25" (0.6 cm) prin toate cele trei strate. Apoi, am intins bine pe vatelina, bucata nou cusuta, presand cu degetul rezerva (nu a fost nevoie sa calc rezervele, dar am avut grija sa netezesc bine cu unghia, fara sa deformez tesatura) si am quiltuit-o.

Quilt-As-You-Go Pouch Tutorial - abeeautifulday.blogspot.com

Am cautat sa am petice mai mari decat era nevoie, chiar daca depaseau cu mult dimensiunile dreptunghiului meu de baza, pentru ca oricum, la sfarsit urma sa tai ansamblul exact la dimensiunea necesara. Mai bine sa fie decat sa nu ajunga, asa-i?

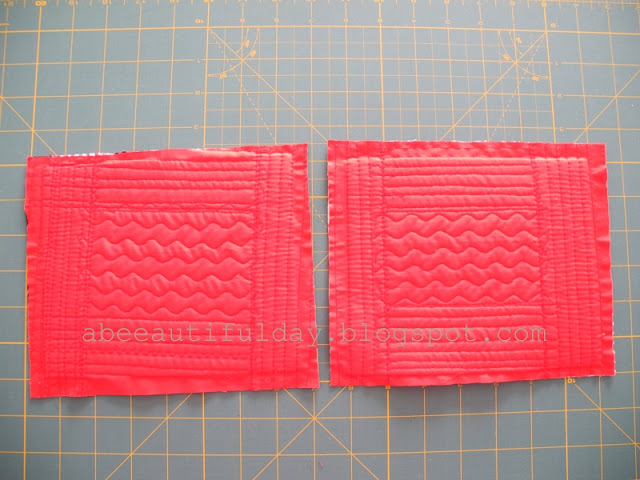
4. Am terminat o fata a portofelului, apoi am procedat la fel si cu cea de a doua.

Quilt-As-You-Go Pouch Tutorial - abeeautifulday.blogspot.com

Quilt-As-You-Go Pouch Tutorial - abeeautifulday.blogspot.com

5. Dupa ce am terminat patchwork-ul, intors cu fata in jos, ca sa vad dreptunghiul de la baza (la mine, panza rosie), am taiat totul la dimensiunea care includea rezervele dorite in mod normal pentru asamblarea portofelului. Pentru latura pe care urma sa cos fermoarul am lasat o rezerva de 0.5" (circa 1 cm), iar pentru celelalte trei laturi, am prevazut 0.25"(0.6 cm).

Quilt-As-You-Go Pouch Tutorial - abeeautifulday.blogspot.com


6. Am pregatit fermoarul si am taiat colturile care vor da largimea fundului portofelului. Dupa ce le-am taiat (cate un patratel de 1"/2.5 cm) mi-am data seama ca nu era cazul, pentru ca forma GPS-ului nu necesita largime...
Quilt-As-You-Go Pouch Tutorial - abeeautifulday.blogspot.com


 7. Am scurtat fermoarul si l-am cusut.

Quilt-As-You-Go Pouch Tutorial - abeeautifulday.blogspot.com

8. Avand grija sa am fermoarul deschis, am cusut una de cealalta, pe dos, cele doua fete ale portofelului, apoi, am inchis si cele doua colturi ai am surfilat totul, pentru ca nu am avut de gand sa adaug captuseala.

Quilt-As-You-Go Pouch Tutorial - abeeautifulday.blogspot.com


9. Am intors totul pe fata (de-aia nu trebuie sa uitati fermoarul inchis!).

Quilt-As-You-Go Pouch Tutorial - abeeautifulday.blogspot.com

10. Si am facut proba:

Quilt-As-You-Go Pouch Tutorial - abeeautifulday.blogspot.com


Pentru poza, am pus GPS-ul in picioare, ca sa se vada, dar el va sta in husa-care-arata-ca-un-port-ceva (ce mi-o fi trebuit sa-i dau largime!!!) culcat.

Oricum, beneficiarul a fost foarte incantat si de cum arata si de cat de bine ii protejeaza jucaria (vatelina dand exact grosimea, fermitatea, dar si moliciunea necesara).

Cu prima ocazie, o sa-i fac o alta protectie pentru aparat, care sa arate chiar a husa!

Spor la lucru si

O zi frumoasa!