At Geta's suggestion, I'm writing this post again, for my foreign visitors. I only hope that my English is better than Google translation.
Because I have a regular sewing machine, the quilting requires much skill handling my work on its narrow area.
I've been thinking about the best option to extend it, neither too complicated nor too expensive. So, I searched the internet and I saw that the ideas reveal two main solutions:
1. a table with an opening for the machine I've been thinking about the best option to extend it, neither too complicated nor too expensive. So, I searched the internet and I saw that the ideas reveal two main solutions:
and
2. an extension that attaches to the sewing machine which can be bought from manufacturers of sewing machines.
The first option I would have liked best because it provides the largest area of work, but my small sewing space made me opt for one large desk both for computer and for the sewing machine, and I didn’t want to complicate the situation by cutting it.
The second option would be the most comfortable, but the extra space offered is insufficient for me.
The second option would be the most comfortable, but the extra space offered is insufficient for me.
So, for a while, I left these things aside.
Until one day, when I had to clean the house after I bought a piece of furniture from my dear IKEA, and I could not let go its box: the shape and the size were not good to store another thing, but the cardboard was so good and hard ....When I put it on the desk next to the sewing machine I realized that it is the ideal solution for me: with minimum effort, time and …money I could transform it into my sewing machine extension! It combines advantages of both solutions: a large area of the first one and the temporary usage of the second one.
Not to mention the environmental aspect of reusing and repurposing the things.
Not to mention the environmental aspect of reusing and repurposing the things.
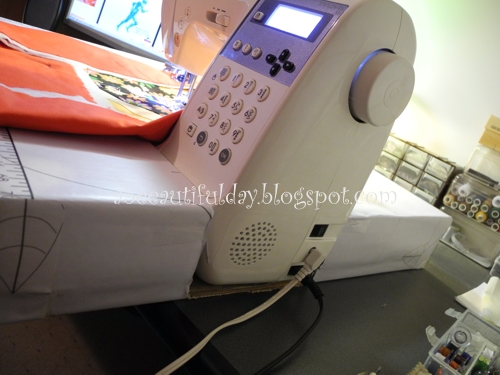
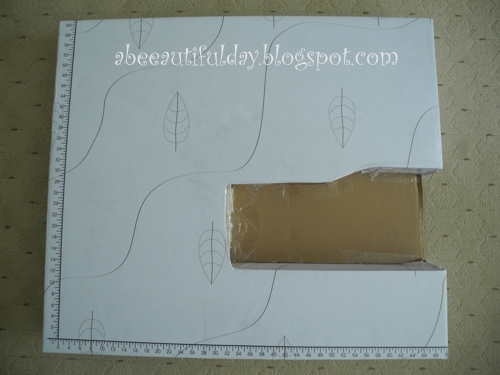
From the bird’s-eye view, don’t you think it is a true table?
But at a closer look things went like this:
- First I decided where and how will stand the sewing machine: through one side of the box, letting free the access to the on/off push button, sockets and cooling grid;
- I put the sewing machine on the box and outlined it with a pencil;
- I cut the outline and filled the box with the polystyrene pieces which protected the original content of the box, to get a hard, firm surface;
- I wrapped the box in a sheet which first I printed to my plotter a scale in inches and a simple design, just to not be a white plain paper and then I laminated it with a thin foil (at a center providing such services), for protection and an easy slip of the fabric;
- I bonded the folded laminated paper to the sides and bottom of the cut with duct tape;
And that was all!
With the more than precious help of my husband (I designed it, he made it), I have now my dreamed extension!It is sufficiently large, lightweight, perfectly matched to my sewing machine and easy to hide when not in use.
Have a beautiful day!


This is an awesome idea! Thank you for sharing in English!
ReplyDeleteThat's genius! You and your husband do wonderful work!
ReplyDeletewarmest regards,
Janice