Showing posts with label mini quilt. Show all posts

Monday, 10 February 2025

Tutorial -- Love Thoughts - Valentine's Quilt Pillow cover (revised pattern)


10 years ago, at this time, I posted on the blog a pattern dedicated to Valentine's Day. 

I revised it and I share the new version of it with you today.


Overview


To sew this block, we use the Sew & Flip method.


Materials


Fabric Options

Quilting cotton, thin denim.
- Solid colors and non-directional prints work best.
- Wash and press the fabric. Starching cotton quilting fabric and thin fabrics helps achieve accurate edge of the pillow cover.

Cutting

- fabric A (accent fabric) - (1) 6" x 9½" and (1) 6” x 15”
        - fabric B (background) - (6) 6"; (1) 9½" squares
                                               -  (2) 1½” x 15”; (2) 1½” x 17” (border). 

Assemble the block

Place the 6” x 15” piece of the accent fabric right side up. Align over its right edge one 6” square of the background fabric wrong side up. Draw a diagonal line onto the background 6” square from the up left corner to the down right corner (see the dashed line). Stitch on the diagonal marking.  Follow the marked line as accurately as you can, in order to get a neat finished piece. Trim the corner off 1/4” away from the stitched line.


Flip the triangle open and press seam allowance toward A fabric rectangle. Align over the triangle of B fabric, another 6” square wrong side up. Mark a diagonal line from the down left corner to the up right corner. 


Stitch on the diagonal marking. Trim the corner off ¼” away from the marked line. Flip the triangle open and press the seam allowance toward the corner triangle. 


Repeat for the second unit.


Sew together the 6” x 9½” unit and 9½” B fabric square with ¼” seam allowance. Place them like in the next images. Press the seam allowances toward the B fabric square.  


Sew together this unit with the first unit with ¼” seam allowance. Press the seams toward the latter. Press. The block should measure about 14¾” - 15”, depending on the accuracy of how you sewed. Add the border pieces. Now, the unfinished block should measure 17".  


Quilting

One of the most beautiful ways to finish a patchwork project is by quilting it. 
Layer:
- at the bottom - 19" x 19" backing fabric, right side down
- in the middle - the 19" x 19" piece of batting
- on top - the block, right side up.
Baste the layers together and enjoy quilting your preferred design. I used a temporary glue spray for basting.


Finishing

Wash the quilt with cold or lukewarm water and mild detergent. 
Lay the quilt flat to dry, smoothing it gently. After drying, press it on the back side, only if needed.
While it dries, prepare the pillow back.
Trim the quilt to 16½”. 


Sew the quilt (which is the front of the pillow)  with the back together.


You're done!

Your Valentine pillow cover is complete. 
As Valentine's Day is a holiday when lovers express their affection with greetings and gifts, don’t stop. Sew this pattern in pairs of pillows.


I hope you'll enjoy making these cuties as much as I do.

If you need other patterns for quick and easy modern quilts or bags, 

It takes you to my Etsy Shop.

All orders made during February 2025 will receive as bonus the quilt pattern Love Thoughts in PDF format.

Have a beautiful sewing day, my friends!
Thank you for your support!


Monday, 12 June 2023

Meeting with friends quilts. Pattern release

I am so glad that after long time, I finally have great news: I just released two quilt patterns!

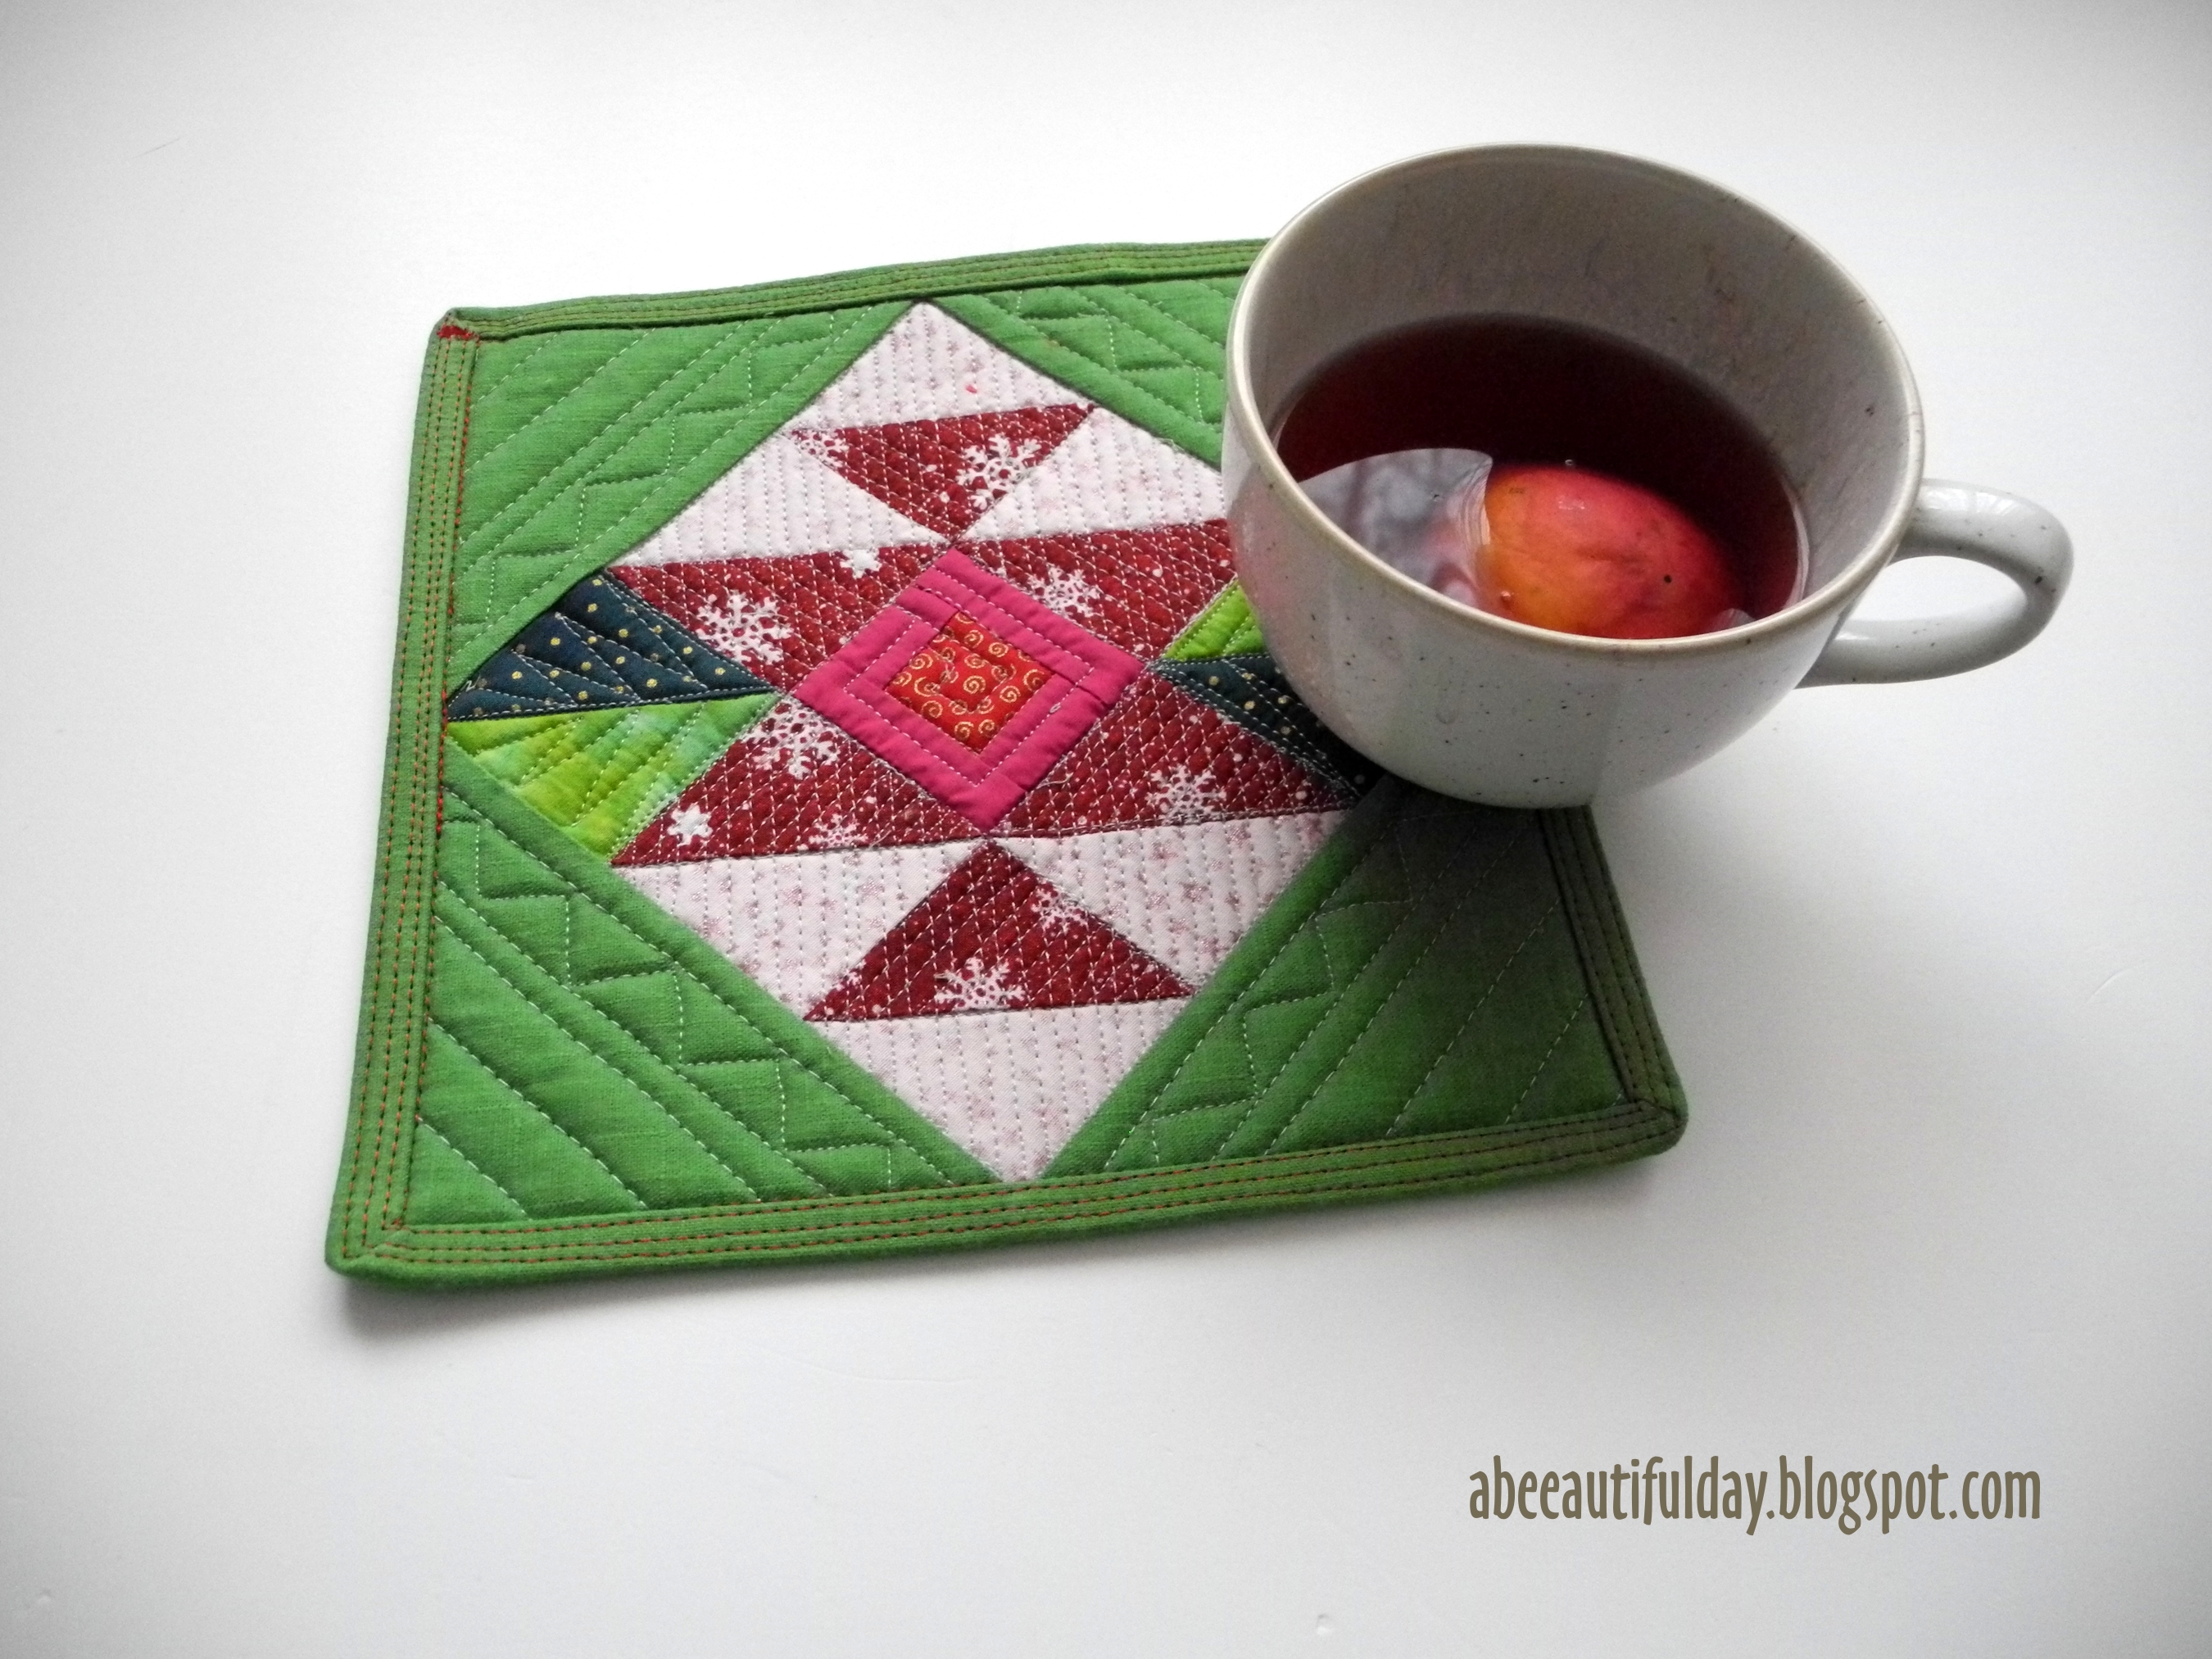
In the late fall of 2021, while the rules imposed in the Pandemic kept us far from each other, I made some patterns for some mini quilts, good to use as coasters. For one of them I wrote the pattern because I realized that it is not only beginner friendly, but also you need only an hour or two to make it. I chose squares, rectangles and half square triangles to play with.

abeeautifulday.blogspot.com-Meeting with friends mini quilt pattern

It's not by chance that I called it “Meeting with friends” as that was the idea I wanted to express:

The central unit symbolizes the table that gathers friends around it. Two triangles meeting at their points symbolizes the friends. The resulting  extension of their lines forms an X-cross, a very harmonious sign for meeting, and the ancient symbol for time (the hourglass).

abeeautifulday.blogspot.com-Meeting with friends mini quilt pattern

This block combines in a simple and modern manner two of the most used patchwork layouts: Log Cabin and Half Square Triangle (HST).

Because Christmas was approaching, I used fabrics in the colors and prints specific to the winter holidays, but the block looks great using a wide variety of color combinations and prints (except large prints).

abeeautifulday.blogspot.com-Meeting with friends mini quilt pattern

Meeting with friends mini quilt measures 8 ¾" x 8 ¾" (22.5 cm x 22.5 cm) before quilting and washing.

It can be used to be displayed on the wall, added to a bag, as well as on the table as a mug rug. For the wall, you should add a sleeve or hanging pockets to the back of the quilt before binding so that the binding covers the raw edges and gives a neat finish (these instructions are not included in this pattern).

abeeautifulday.blogspot.com-Meeting with friends mini quilt pattern

Then, one of my friends who helped me testing the pattern, asked me to enlarge the block for making a pillow cover. So it came out a 17” (43.5 cm) square block and I got to the point where the natural question arose: what would a quilt from several such blocks look like? I designed layouts and layouts, searching “the one”, the versatility of this block giving endless set ups and quilt styles.

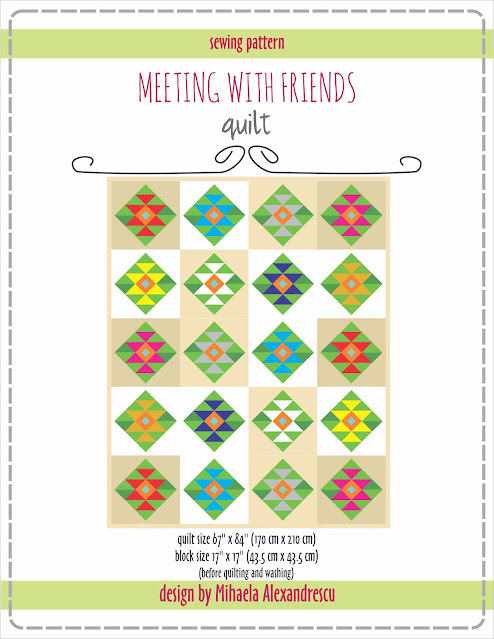
It was hard to choose which layout I will use for making a sample quilt, but in the end I chose this one:

abeeautifulday.blogspot.com-Meeting with friends quilt pattern

Meeting with friends quilt is based on only one 17” quilt block. It is a user-friendly pattern and provides step by step color photo guide and instructions to cut and machine piecing, and gives also hints and tips which will help you to assemble this quilt faultless.

 The quilt measures 67" x 84" (170 cm x 210 cm) before washing and quilting.

Quilt sizes based on 17"/43.5 cm “Meeting with friends” block:

- Baby/Crib - approx. 34" x 50½" (86.5 cm x 128 cm) 

- Throw - approx. 50½" x 50½" (128 cm x 128 cm) 

              - approx. 50½" x 67" (128 cm x 170 cm)

- Twin - approx. 67" x 84" (170 cm x 210 cm)  (the quilt featured in this pattern).

- Full/Queen - approx. 84" x 100" (210 cm x 254 cm).

 It's an easy quilt pattern even for the beginning quilters and it is perfect for anyone who wants to sew a simple, cheerful, quick and modern quilt.

abeeautiulday.blogspot.com-Meeting with friends quilt pattern


Meeting with friends quilt is not difficult to make, but it does require a bit of precision.

 In this pattern you will find also suggestions and information for sewing quilts with different layouts, settings, dimensions and color combinations based only on this block.

This pattern is Fat Eighths, Fat Quarter and yardage friendly.

abeeautiulday.blogspot.com-Meeting with friends quilt pattern

Look how beautiful turn out my One block-pillow covers! Using only one 17" Meeting with friends block and your scrap pile, you could cheer up your dining room, bedroom and/or porch.  


abeeautiulday.blogspot.com-Meeting with friends quilt pattern

Both patterns are also budget-friendly because they give you the opportunity to use up your leftover fabrics for which you have been waiting for the quilts that will deserve them.

 If you don't want a busy quilt design and you are looking for a fast project for which you don't need any fancy tools, but only very basic quilting supplies, then these two quilts are for you!

You’ll end up with beautiful quilts that look like a pro made them!

Would you like to make at least one Meeting with friends mini quilt or quilt of your own? You can purchase this patterns by clicking here. You can get this patterns at a 25% OFF INTRODUCTORY PRICE now through Thursday, June 15 2023.

Thank you my friends!

Have a beautiful sewing day!


Sunday, 11 November 2018

Summer Sorbet between Autumn and Winter


And here we are at the beginning of the penultimate month of this year. Just between the sumptuous golden Autumn and the whimsical silver white Winter.

The project I want to share with you today is a quilted table topper I just finished.

Summer Sorbet between Autumn and Winter-abeeautifulday.blogspot.com


The pattern is Summer Sorbet by Geta Grama, the block variant without borders.

I confess that I started to work with a heavy heart. I have avoided for a long time piecing together octagons, trapezoids, and triangles.

Summer Sorbet between Autumn and Winter-abeeautifulday.blogspot.com


I never thought that this could be an easy job. But it really was easy. Because Geta gives a lot of useful instructions and images, and above all, she gives a lot of tips in order to prevent mistakes.

Summer Sorbet between Autumn and Winter-abeeautifulday.blogspot.com


There are also illustrated suggestions for finding the best quilting design and what I much appreciated - printable pages for trying different quilting designs. Very useful, as you might see.

Summer Sorbet between Autumn and Winter-abeeautifulday.blogspot.com


Working on my table topper was a relaxing activity.

Summer Sorbet between Autumn and Winter-abeeautifulday.blogspot.com


Thank you, Geta! Your pattern is really good!

Have a beautiful sewing day, my friends!

Monday, 3 July 2017

I Love My Doll applique pillow cover quilt pattern is ready!


I just launched the pattern of a cute little quilt:
I love my doll!


Its dimensions -  16" x 16 " -  are ideal for a pillow case or a wall hanging for a lovely little girl.  
The pattern includes instructions for a pillow case.
The main technique is the raw edge applique - simple and fast. One border added to the doll block and the quilt top is ready. Oh, I forgot to tell you that the doll name is Emma.
I told you something about her and her sister a while ago when I introduced them to you.


The pattern provides:
- instructions for preparing the applique pieces
- instructions for piecing the quilt top
- instructions for preparing one color and two color prairie points
- suggestions for securing the applique edges and quilting
- instructions for finishing the quilt 
- instructions for assembling the pillow cover
- layout suggestions
- ready to print templates

There are 40 illustrations and diagrams gathered in 16 pages.
The measurements are in inches.

You need:
Fabrics 
- one fat quarter or 18" x 18" piece of fabric for border; 
- one fat quarter or 18" x 18" piece of fabric for backing
- one fat quarter or 16" x 22" piece of fabric for the pillow back
- a few pieces of fabric for the appliqued doll 
- 2 ½ " x 80" for binding
Batting 
- 18 " x 18" 
Fusible web - about 8 " x 18" or temporary adhesive spray or fabric glue that maintains its qualities after pressing.
Water soluble pen, red and black permanent markers
Scissors, coordinated thread
Open – toe foot for securing the applique edges


In addition to this pattern, I'm working on the templates of a few friends of Emma. Girls and boys. You will have the possibility to add one by one a collection of applique dolls for your kid's room or to choose the ones they like most.
Emma's friends will be available as templates only. You will use the instructions of Emma pattern, launched today, I love my doll!
Emma's friends individual templates will be listed in my Etsy pattern shop, as I will finish them.

I love my doll pattern is here.
I hope you will enjoy it!

Have a beautiful day, my dears!

Linking to Finish it up Friday!


Monday, 6 March 2017

Improvisational quilts at a small scale


I had to make a few tablet sleeves. A perfect occasion to sew again mini quilts.
This time I approached a difficult theme: improvisation.

Triangles

I just picked up the fabric pieces by color, no matter if the fiber was natural or synthetic.


incorporated in this tablet sleeve front:


Sticks

I used only my hand painted fabrics.


and the tablet sleeve to which it belongs now


Fly

Using my hand painted fabrics


transformed in this tablet sleeve front


For these tablet sleeves, I used Little Wonders pouch pattern by Geta Grama.
I just changed the original size to get about 13" x 9".


I liked the improvisational process. I think I will try it again.

Have a beautiful day, my dears!


Wednesday, 18 January 2017

One mini quilt = one pouch -- # 3

Today is the turn of the third mini quilt to welcome you.
If you want to see the little stories of the first two mini quilts of the series, please go here and here.

Here is my
Happy Flowers mini quilt:


I used painted fabrics for flowers, stems and leaves and commercial fabrics for the background.
I chose this free motion quilting to give some texture to the background and I used a narrow zig-zag stitch to secure the appliqued flowers edges.

Now look at its transformation:


A simple beautiful pouch.

On the pouch back I kept the same way of quilting as for the other two pouches: alternating a few lines with unequal zig-zag stitches.


It was another quick and fun project I am sure will have some followers.

The Mini quilts becoming pouches series continue. From time to time I will bring some of them here, on the blog.

Linked to Finish it up Friday!

Have a beautiful day, my dears!


Tuesday, 10 January 2017

One mini quilt = one pouch -- # 2

In the last days of 2016, I made a few pouches. On that occasion, I inaugurate a new series of posts on the blog about mini quilts. What's the connection between pouches and mini quilts?  Well, at the beginning, each of these pouches was a mini quilt.
 If you want to see the first one, please go here.
Today is the turn of the second mini quilt to be presented.
I named it Serenity.


As you may see, I improvised a simple patchwork design, sewing a few strips and scraps of painted fabrics from my stash. I wanted that the quilting to contribute to the calm feeling inspired by the soft color combination.


The pouch made from it is so delicate!


On the pouch back I played alternating a few lines with unequal zig-zag stitches.
It was another quick project I so loved to do. 

Have a beautiful day, my dears!

Thursday, 22 December 2016

One mini quilt = one pouch -- # 1

I made a few pouches for one of my friends. She wants to give them as Christmas presents.
Luckily the design was my choice.

I decided to make for the fronts of three of them three different mini quilts. But the fabrics from my stash have not encouraged at all my imagination, so I painted a few pieces of fabric and I started working.

Here is #1
I named it Surprise Mini quilt


I liked very much improvising this log cabin design using pieces of commercial fabrics and painted fabrics.The quilting is simple just to calm down a little the bright composition.

On the pouch back I inserted a line of zig-zag stitches, playing just a little bit with the zig-zag width.


  I have put all together and the pouch was ready in no time.


 Have a beautiful day, my dears!