Saturday, 14 December 2019

When in doubt, make a bag! - Two tips for those who sew bags

Like many of you, I buy fabric sometimes just because I like it. Maybe for the color combination or its design, or for its texture ... or for all of these together.
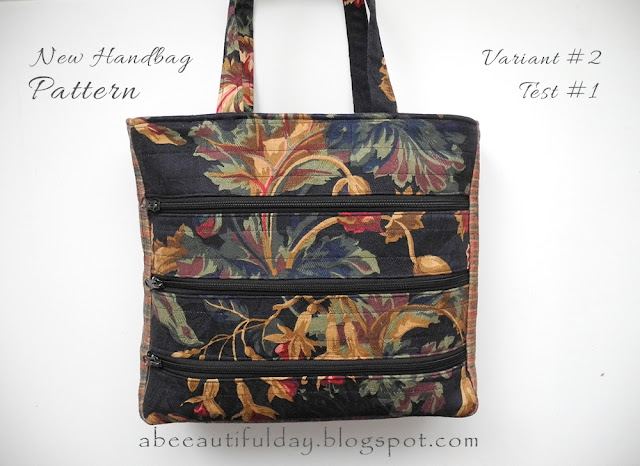
On such an occasion I bought a piece of fabric for home decor, only because I really liked the classic floral design lying on the dark background. The opportunity to put him to work came these days when I decided to use it for the 2nd variant of my unfinished bag pattern.

Two tips for those who sew bags - abeeautifulday.blogspot.com


First of all, it helped me to see what this bag model made of this type of fabric looks like, but also to test what happens when you sew zippers on such a fabric and how thick its pieces are sewn together.


Two tips for those who sew bags - abeeautifulday.blogspot.com

What I can share with you now from this experience is this:

When sewing home decor fabric, if you need a second fabric (for the gusset, my example) one good idea is that both fabrics have the same composition and thickness.
1. Same composition helps you to iron the bag pieces using the same temperature for all and, consequently, finish the work faster without melting accidents, if you use polyester blends.
2. Close or identical thickness helps you control the bag shape and it makes a lot easier to sew the bag pieces on the sewing machine.

Two tips for those who sew bags - abeeautifulday.blogspot.com


Now, back to writing the conclusions of this test for my no-name-yet bag pattern.

Two tips for those who sew bags - abeeautifulday.blogspot.com


Have a beautiful weekend, my dears!

Saturday, 26 October 2019

Fabrics with my own printed designs


If you really want to do something, you will find a way!
I keep telling this to myself, whenever it seems to me that I want something unrealistic or when I am about to give up something difficult to complete.

Having fabrics with my own printed designs is an old dream.This dream began to come true, slowly, very slowly, gathering small bits of active breaks taken to reorder my thoughts by drawing. Between job and other activities, between something and something else, or while I drink a coffee, or before bedtime...
One day, when the good planets were probably lined up, I decided to choose a few drawings and send them to a  fabric printing company.
Because both the domain and the printing company were new for me, I was cautious. Instead of printing yards of fabrics with flowing design I chose to design panels as they might have at least two uses: as bandanas, neckerchiefs, handkerchiefs or whatever you want to call them, and as pieces of fabric for sewing home accessories (pillow covers, for example).

Long story short, I introduce to you My First Collection of Bandanas!

abeeautifulday.blogspot.com-fabrics with my own printed designs

Each of them measures 48.5 cm x 48, 5 cm (19" x 19").

More about them I will tell you soon.

Have a beautiful day, my dears!

Tuesday, 8 October 2019

Tips and tricks for sewing beautiful bags by spending clever your money -1

One of my dearest activities is sewing bags. All kind of bags: large, small, handbags, totes, shopping bags (oooh, how I love them!) and of course, pouches.
Even though it is impossible to find here where I live the perfect combination of fabric-lining-interfacing-batting-hardware for bag making, I try to gather the best ones from all kind o places: our local shops or online shops and overseas online shops. The last source I just mentioned would be my first choice if the transport prices would not have increased so much, that doubles the cost of the order.
But when you really want something, you find a way to do it. In my case this "something" is making bags. In order to get good quality materials at a reasonable price I spend a great amount of time finding the places that fit to my budget. I know from my own experience that you won't get a high quality product using low quality materials. No matter how much you want or do, you won't get a really beautiful and durable bag in time. If the fabric colors will bleed, the interfacing will detach or the thread will break after the bag will be worn only a few times, the feeling of working in vain will be overwhelming.
That's why a constant of my work is that all the time I look for methods to keep the quality as high as possible thinking at the same time on what I can spend less.
One of my tricks to do this is buying cotton curtains from thrift shops. These shops are treasure boxes where, with a bit of patience, I find beautiful curtains that may be use for the exterior bags, lining or shopping bags. One piece of curtain means a few yards of home decor fabric at a good price with the color wash out test already done.
I use them after I wash them (for hygienic purpose) especially for my mock-up while I'm working on a bag pattern, as I need a lot of tests and I want to preserve the new good fabrics for the final bag.
Sometimes I use them too when I want to make a bag "now", I don't have the matching new fabrics in my stash but I have a piece of a thrift shop curtain just good for it.  

Look at this bag.

abeeautifulday.blogspot.com - Tips and tricks for sewing beautiful bags by spending clever your money

It is the bag whose pattern I'm working now.

abeeautifulday.blogspot.com - Tips and tricks for sewing beautiful bags by spending clever your money

It is its first mock-up for which I used a piece of fabric from a cotton curtain bought from a thrift shop a long time ago, only because I loved the print and it was in a very good condition.

abeeautifulday.blogspot.com - Tips and tricks for sewing beautiful bags by spending clever your money

For straps I used leather - a premiere for me. On this occasion I learned to set rivets. I really liked this because this way I finished the bag much faster than if I had to make them from fabric and sew them on the bag. Not to mention how it looks a bag with leather straps!
No, my budget wasn't hurt by them. I will tell you why in the next episode of "Tips and tricks for sewing beautiful bags by spending clever your money".

Have a beautiful day, my dears!


Sunday, 29 September 2019

About Illusions

An intriguing post title, isn't it? Don't be afraid!I am not going to bore you with some philosophical considerations.
This is the name of Geta Grama's newest quilt pattern I used for sewing two pillow covers.


abeeautifulday.blogspot.com-pillow covers using Geta Grama's pattern -Illusions II-


In fact it was the best opportunity to practice Y-seams in order to make a kaleidoscope block.


abeeautifulday.blogspot.com-pillow covers using Geta Grama's pattern -Illusions II-


I'm not into kaleidoscope quilts at all. My past experiences made me to conclude that I'm incompatible with this kind of technique. Even though I'm a patient person, paying attention to details, I had enough of mistaken again and again the Y-seam and of getting incomplete or shifted layouts.
Knowing that Geta is a meticulous teacher, I got Illusions II pattern as my last chance to make a decent kaleidoscope quilt.
And my expectations were confirmed. I'm not incompatible with this sewing technique, I just didn't know those tips and tricks so important for the exact piecing.


abeeautifulday.blogspot.com-pillow covers using Geta Grama's pattern -Illusions II-


abeeautifulday.blogspot.com-pillow covers using Geta Grama's pattern -Illusions II-


As always, Geta putted in her pattern a lot of sewing knowledge, useful not only for making this very block, but also for other types of patchwork projects, like:
- how to cut triangles in three different ways;
- how to accurately piecing in the easy way;
- how to finish the block as pillow cover in any size and as place mat;
- how to make a pillow insert;
- how to use the entire width of the fabric;
and a lot of other instructions that guide you so well that you can finish your project in one day only.
At the end of it, if you followed conscientiously Geta's instructions,  you might consider that you just stepped in the experienced quilters world.


abeeautifulday.blogspot.com-pillow covers using Geta Grama's pattern -Illusions II-


abeeautifulday.blogspot.com-pillow covers using Geta Grama's pattern -Illusions II-


Have a beautiful sewing day, my dears!


Sunday, 2 June 2019

Scattered Quilt next to the Racetrack Quilt


Hello friends,

Did you think I abandoned this blog?
Looking at the date of the last blog post, you would be right to think like that.
The truth is, last autumn I took a second job. Since then, in the 24 hours of a day, more duties have to be done.
My passion for sewing has the same intensity, but I have not yet managed to organize my time so that writing about it on my blog to be placed somewhere above other things on my list of priorities.

Beyond this, the other thing that postponed my presence on the blog was my sewing machine. I had to take it to the repair shop for fixing the feed dog. I took it back about a week ago and I just managed to finish a quilt that I started last summer.
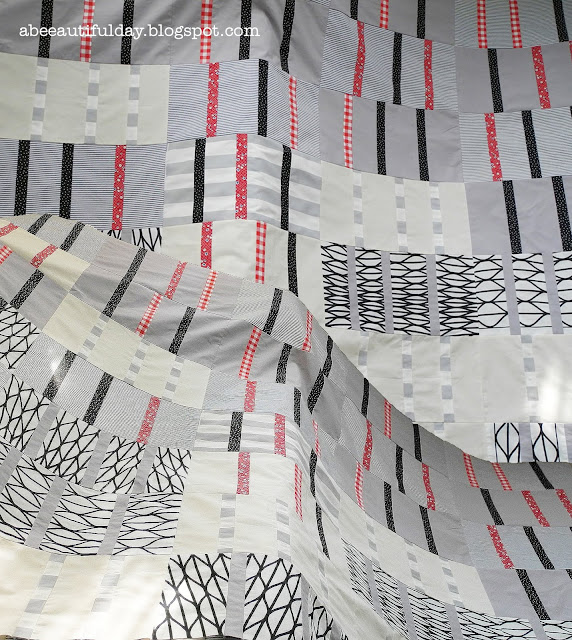
Now I can show you what I have been working on. My second quilt for my corner couch:

The Scattered Quilt

quilted
Scattered Quilt-abeeautifulday.blogspot.com

before quilting
Scattered Quilt before quilting - abeeautifulday.blogspot.com

Quilt size - 59" x 86".
Number of blocks - 35 (5 x 7 setting)

In this quilt I wanted to compose a layout with an improvised-like look from rectangles of different sizes.
I used Kona Cotton, Ikea fabrics, fabrics I received as gift, and fabrics from a local shop. 
About the color range: as you may see, I chose the neutral gray-white background broken by red and black stripes.
Scattered Quilt before quilting - abeeautifulday.blogspot.com

The quilting was really challenging. After I finished piecing the top I realized that I have no idea how to quilt it. I drawn a few variants of designs and I even tested one of them quilting it by hand and by machine, but I didn't like any of them.

hand quilting test
Scattered Quilt hand quilting test- abeeautifulday.blogspot.com

I would have liked a quilting design made out of straight lines. Unfortunately, at that time my quilting options were limited by my defective sewing machine: the feed-dog not working properly I couldn't use the walking foot. 
So finally, with the free motion foot, I quilted waving lines of two colors (black and red), spreading out all over the quilt surface the movement of the waved grid pattern of one fabric of the top.

Scattered Quilt quilted - abeeautifulday.blogspot.com

In order to avoid a quilting pattern monotony, on only one of the 7 columns of the quilt blocks I alternated a few quilting designs,using only gray thread.

Scattered Quilt quilting designs - abeeautifulday.blogspot.com

Scattered Quilt quilting designs - abeeautifulday.blogspot.com

I bound the quilt with a white stripe of fabric when my sewing machine was back from the repair shop. 
How glad I was to have again an equal stitch length on my binding!

Scattered Quilt binding - abeeautifulday.blogspot.com

One thing I still don't manage: non swinging quilt edges. They are straight cut and carefully handled while stitching the binding, but when the quilt was hanged on the wall to take a few photos, the edges were waving back and forth. You may see these in the first photo I posted. Maybe because it was hanged on a surface narrower than the quilt width and the long edges had no background at all? I will try to find a wall large enough for the quilt and see how the edges will look in this case. 

However the quilt looks nice on the couch.
with some matching pillows 

Scattered Quilt - abeeautifulday.blogspot.com

...or just thrown on it waiting for someone to snuggle under it. 
Scattered Quilt - abeeautifulday.blogspot.com


The best part of sewing things for your own home or for others is seeing them in use.

And as I told you that this is the second quilt I made for my couch, anticipating someone's curiosity, I bring here also the first quilt I made for the short side of my couch: The Racetrack Quilt. 

Racetrack Quilt-abeeautifulday.blogspot.com


A few thing about it you might find here and here

Now I miss only one more quilt: a small one for the corner element bounding the two sides of the couch. I think a whole cloth quilt would be the best option.

Until the next post,
Have only beautiful days, my dears!

P.S. If you need inspiration for sewing something nice, have a look in my little pattern shop


Sunday, 17 February 2019

Lined Drawstring Backpack Pattern is here!


Do you need a drawstring backpack?
My new pattern might help you to sew one or more.

This Lined Drawstring Backpack is a charming one, perfect for everyday use.
It has a stylish look and a practical structure. Its three large pockets (one exterior zippered pocket and two interior pockets) make it the perfect bag for school, sport and outings.
I've told you about it here and here.

Lined Drawstring Backpack pdf pattern-Mihaela Alexandrescu

The pattern consists of 28 pages of easy to follow instructions and 83 color photos and diagrams, plus printable templates if you want to applique a retro truck.
I'm sure you noticed in the photo above another applique - a name. 
In order to personalize your drawstring backpack with monograms, names, words etc. you will receive together with the Lined Drawstring Backpack Pattern the set of 26 printable letters I used for the name that you see in the photo. About this set of letters you may learn more visiting my shop, from where it can be purchased as a stand alone pdf file.


RAW Alphabet Letters Template-Mihaela Alexandrescu

Purchasing the Lined Drawstring Backpack Pattern you will get
RAW Alphabet Letters Template for free.  

What you will find in Lined Drawstring Backpack Pattern?

- suggestions about what fabrics to choose
- diagrams to help you cutting the needed pieces from the exterior fabric, interfacing and lining
- guidance for cutting and sewing two variants:
      - one panel variant (if you use solids or non-directional print)
      - two panel variant (if you use directional print)
- instructions for preparing and fusing the applique pieces
- suggestions for securing the applique edges
- detailed instructions to sew a zippered pocket on the front side of the backpack
- directions for attaching Velcro tape for closing the interior pockets
- illustrated instructions for preparing and attaching the cord loops
- tips about handling the directional fabric, the fusible web, how to give to the zippered opening of the exterior pocket an original look, and  other useful information.
- truck design template

To make such a useful and modern drawstring backpack you will need:

Fabric
 - Exterior fabric
                    Variant 1 - if you use solids or non-directional print – about 20” (51 cm ) of 42"( 107 cm) wide fabric
                    Variant 2 - if you use directional print -  two pieces 15" x 20" ( 38 cm x 51cm)
  - Lining fabric - 42" (107 cm)  of 42" (107 cm)  wide fabric for lining and pockets
Lightweight interfacing
  - one piece 25" x 33" for pockets
  - if you use quilt cotton for the exterior drawstring backpack body:
                  - for variant 1- one piece 14 ½" x  41 ½" (37 cm x 105.5 cm)
                  - for variant 2 - two pieces 14 ½" x 20" (37 cm x 51 cm)     
For applique - Optional
- Assorted fabrics - a few pieces - for the truck and letters
- Fusible web - 10"(25 cm) of 18" (approx. 46 cm) wide
Zipper - 7" (18 cm)
Cording - (2) 71"(approx.180 cm) about 1/4" (0.5 - 0.6 cm) thick
Twill tape - 6" (15.0 cm) of 1 " ( approx. 2.5 cm) wide - for 2 drawstring loops
Velcro tape - 2" (5 cm) of approx. 1" (2.5 cm) wide
Sewing thread to match the fabrics
Zipper foot - I recommend it but if you don't have it, you can use your regular sewing machine foot instead.
1 Safety pin
Water soluble pen


Lined Drawstring Backpack pdf pattern-Mihaela Alexandrescu
One PanelVariant - solid fabric - with zipper sewed on top of the exterior pocket opening, with truck and letters applique

Lined Drawstring Backpack pdf pattern-Mihaela Alexandrescu
Two Panel Variant - directional print - with zipper placed behind the exterior pocket opening, no applique.

Lined Drawstring Backpack pdf pattern-Mihaela Alexandrescu

Lined Drawstring Backpack pdf pattern-Mihaela Alexandrescu

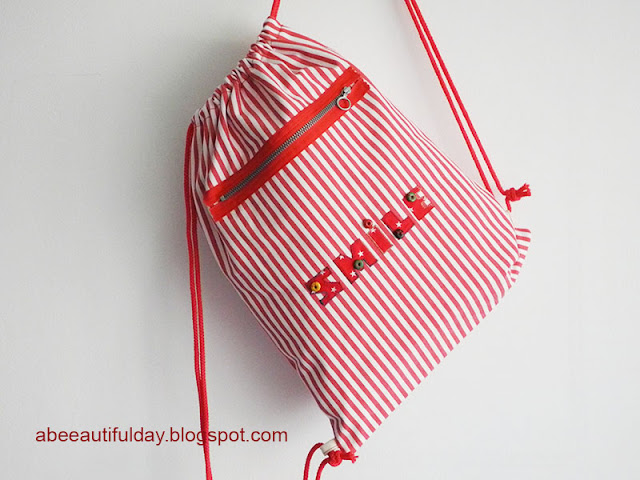
Either One Panel Variant or Two Panel Variant - stripe fabric - with zipper placed on top of the exterior pocket opening, with letters applique and hand sewn little embellishments.

Lined Drawstring Backpack pdf pattern-Mihaela Alexandrescu

Lined Drawstring Backpack Pattern is available in my shop at an introductory price until 20 February 2019 only.
Take advantage of this promotion!

Lined Drawstring Backpack pdf pattern-Mihaela Alexandrescu


Have a beautiful day, my dears!


Wednesday, 13 February 2019

Lined Drawstring Backpack Pattern Sneak Peek

I am so happy when I have to make bags or pouches but it takes me a long time to choose the fabrics and almost every time I think I don't have the right ones. 
When designing a bag, first of all I think to be useful: to be spacious enough, but not too large, to have as many pockets as possible, placed as handy as possible, to be worn as comfortable as possible. After all these I look for the aesthetic aspects of the shape.
Two years ago, a friend asked me to sew two drawstring backpacks for her nephew. The only expressed wishes were: to have on them his name( Toma), the dimension - 13" x 17" (33 cm x 43 cm), and one of the backpacks to be lined.
This time I don't know why, all came to my mind so clearly and quickly: the colors, the customization idea, the inside organisation, the cord casing...
Finally they came out like that :

My Pickup Truck - unlined drawstring backpack
LinedDrawstringBackpackPattern-abeeautifulday.blogspot.com

and

My Truck - lined drawstring backpack 
LinedDrawstringBackpackPattern-abeeautifulday.blogspot.com

Instead of just laying down the letters over the background I created the designs of two toys that are near the boys hearts from generations, carrying the name of the child. 
First of all I had in mind that their pieces to be easy to cut and assemble, but I confess that I also wanted to give a vintage touch to the backpack . The cars and letters are raw edge applique having the edges secured with zig zag stitch and blanket stitch - easy and fast to do.The big exterior pocket of the lined backpack adds loads of room for all kind of things that have to be on hand. The zipper stitched on top of the pocket opening integrates so well into the layout of the backpack and is so decorative. Not to mention that it was so easy to sew it.

LinedDrawstringBackpackPattern-abeeautifulday.blogspot.com

The two inner pockets are so large that they are almost dividers. Velcro tape closures is added for extra security.

LinedDrawstringBackpackPattern-abeeautifulday.blogspot.com

For the name of the boy I used the 2" reversed letters templates from my RAW Alphabet Capital Letters Template that can be found here.

For those of you who would like to sew a so useful and modern drawstring backpack for your loved ones, I wrote a pattern full of illustrated instructions and tips.
Just a sneak peek for now:


LinedDrawstringBackpackPatternCover-abeeautifulday.blogspot.com


More about it in the next post.
Very soon.
Keep in touch!

Have a beautiful day, my dears!