Showing posts with label quilt pattern. Show all posts

Monday, 12 June 2023

Meeting with friends quilts. Pattern release

I am so glad that after long time, I finally have great news: I just released two quilt patterns!

In the late fall of 2021, while the rules imposed in the Pandemic kept us far from each other, I made some patterns for some mini quilts, good to use as coasters. For one of them I wrote the pattern because I realized that it is not only beginner friendly, but also you need only an hour or two to make it. I chose squares, rectangles and half square triangles to play with.
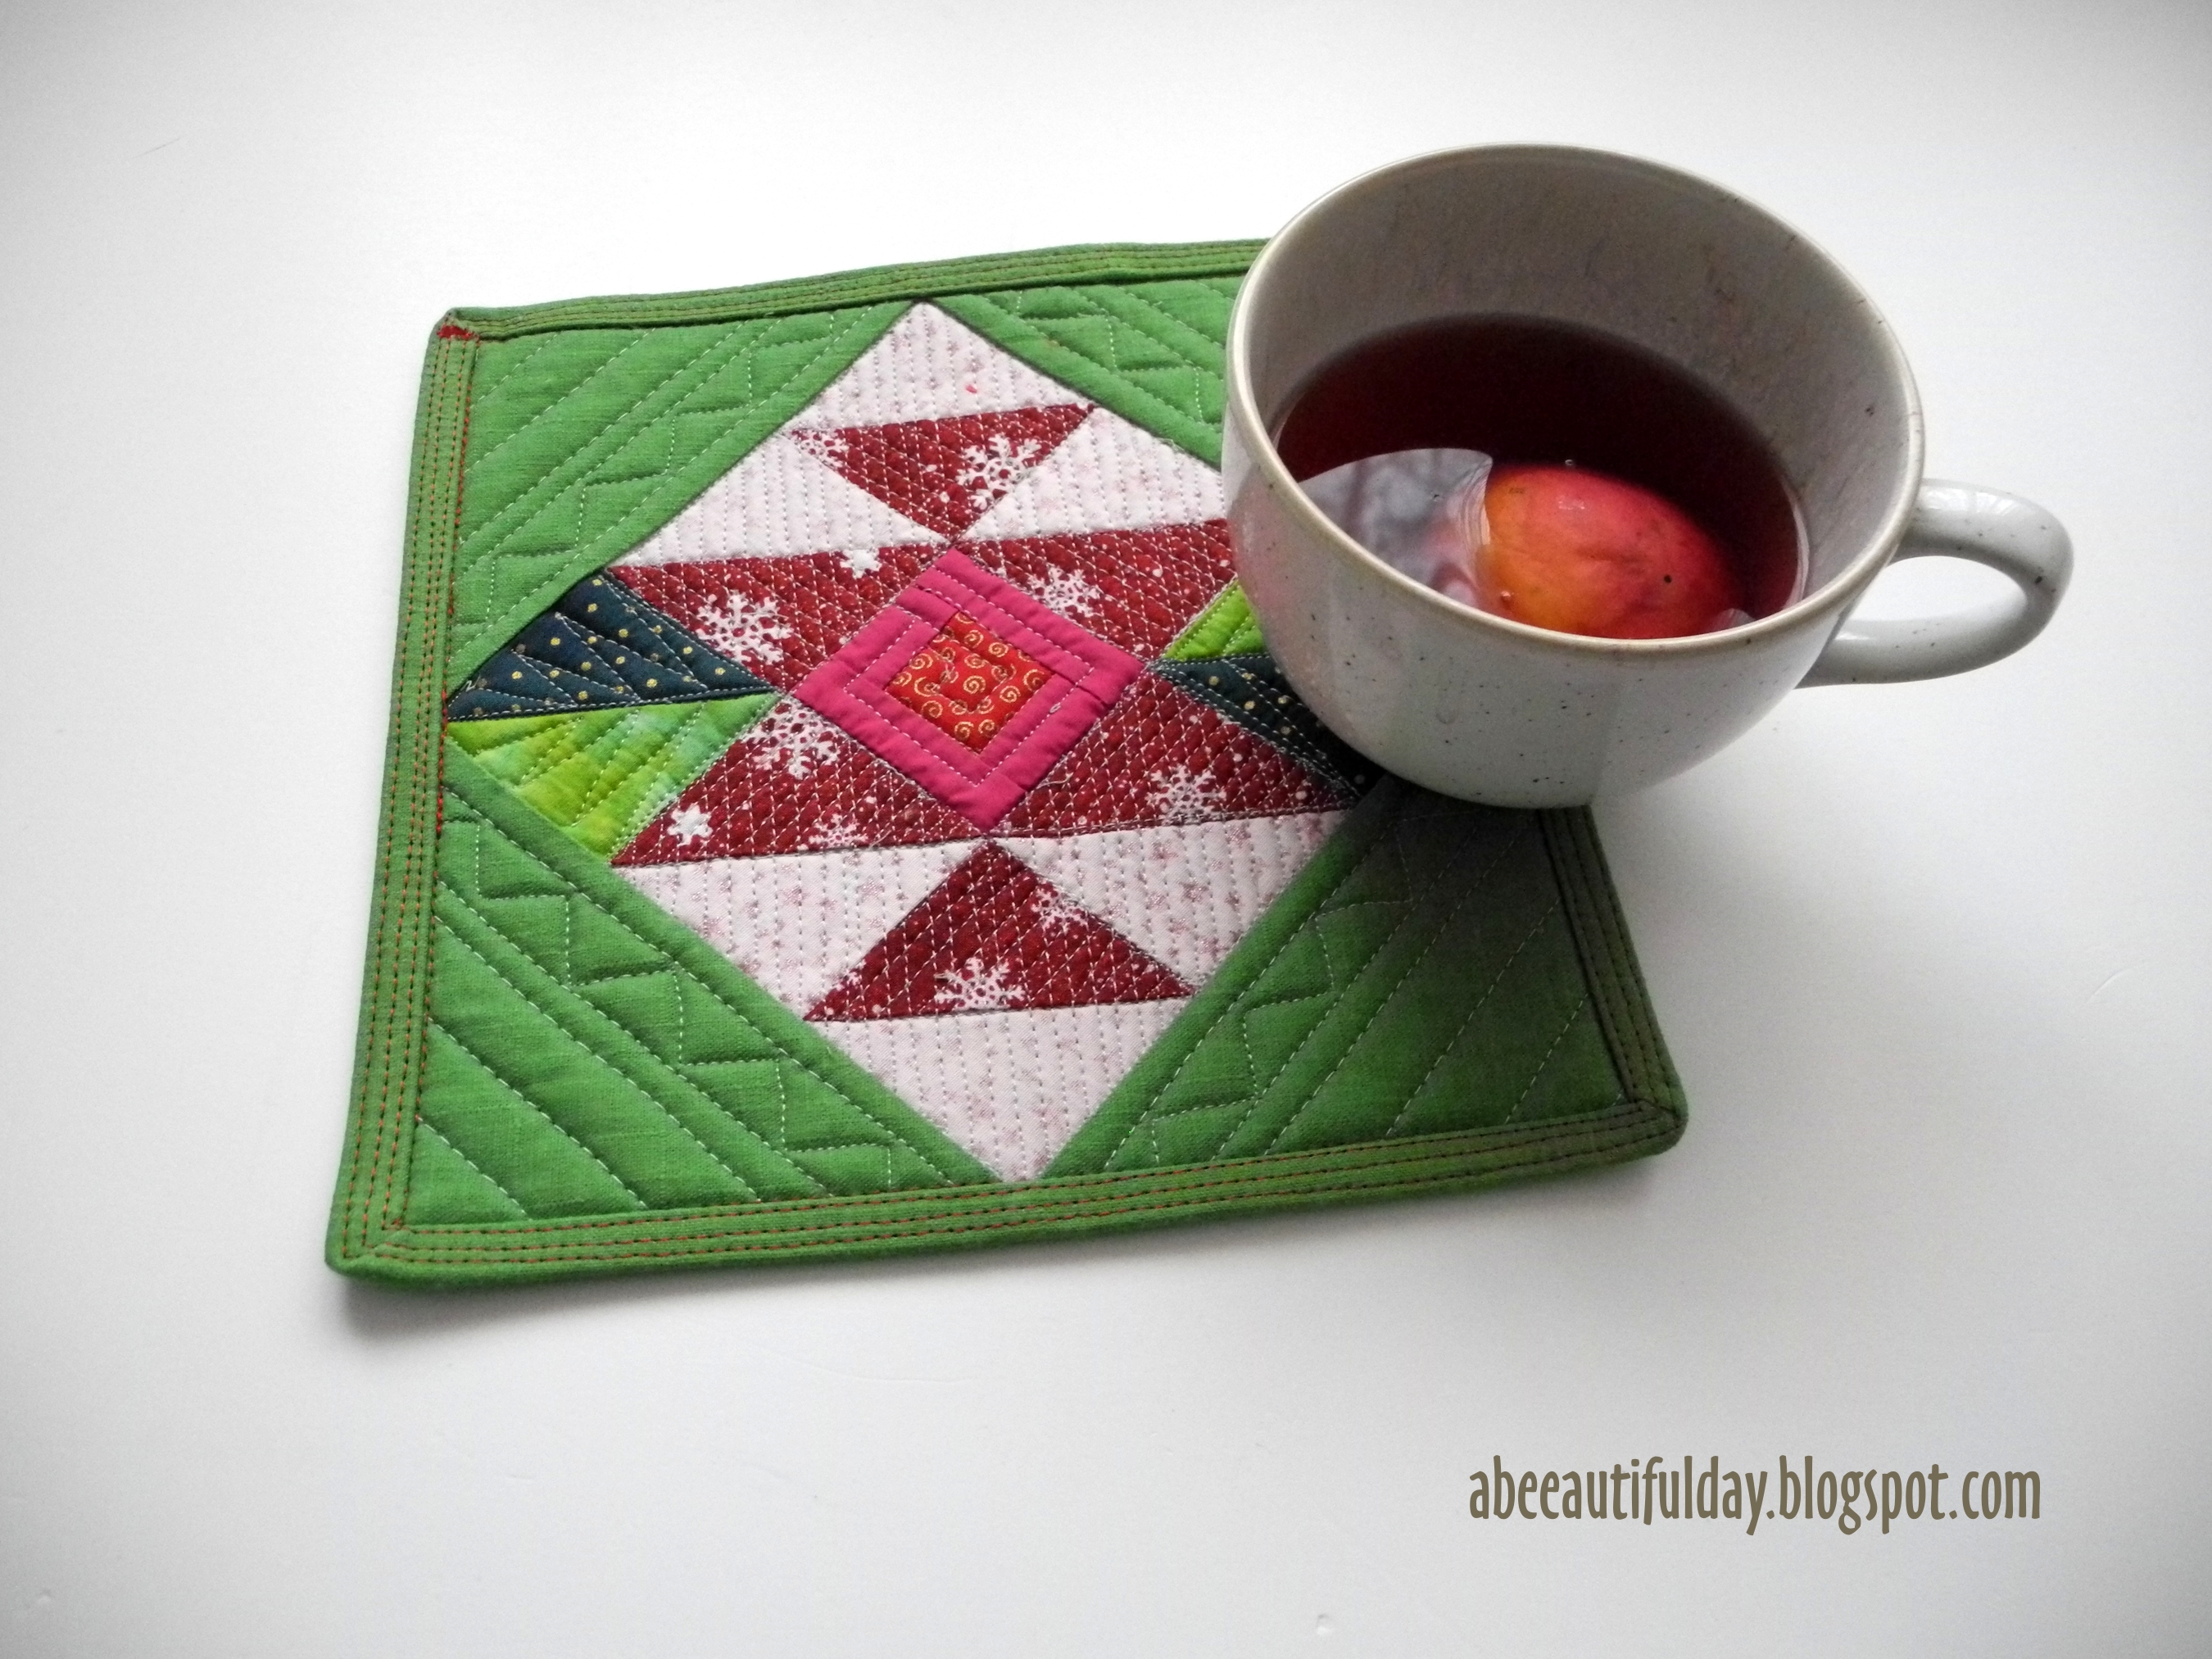
abeeautifulday.blogspot.com-Meeting with friends mini quilt pattern

It's not by chance that I called it “Meeting with friends” as that was the idea I wanted to express:

The central unit symbolizes the table that gathers friends around it. Two triangles meeting at their points symbolizes the friends. The resulting  extension of their lines forms an X-cross, a very harmonious sign for meeting, and the ancient symbol for time (the hourglass).

abeeautifulday.blogspot.com-Meeting with friends mini quilt pattern

This block combines in a simple and modern manner two of the most used patchwork layouts: Log Cabin and Half Square Triangle (HST).

Because Christmas was approaching, I used fabrics in the colors and prints specific to the winter holidays, but the block looks great using a wide variety of color combinations and prints (except large prints).

abeeautifulday.blogspot.com-Meeting with friends mini quilt pattern

Meeting with friends mini quilt measures 8 ¾" x 8 ¾" (22.5 cm x 22.5 cm) before quilting and washing.

It can be used to be displayed on the wall, added to a bag, as well as on the table as a mug rug. For the wall, you should add a sleeve or hanging pockets to the back of the quilt before binding so that the binding covers the raw edges and gives a neat finish (these instructions are not included in this pattern).

abeeautifulday.blogspot.com-Meeting with friends mini quilt pattern

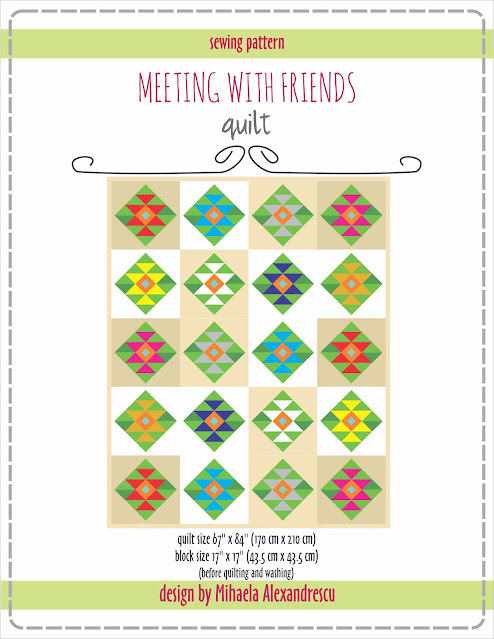
Then, one of my friends who helped me testing the pattern, asked me to enlarge the block for making a pillow cover. So it came out a 17” (43.5 cm) square block and I got to the point where the natural question arose: what would a quilt from several such blocks look like? I designed layouts and layouts, searching “the one”, the versatility of this block giving endless set ups and quilt styles.

It was hard to choose which layout I will use for making a sample quilt, but in the end I chose this one:

abeeautifulday.blogspot.com-Meeting with friends quilt pattern

Meeting with friends quilt is based on only one 17” quilt block. It is a user-friendly pattern and provides step by step color photo guide and instructions to cut and machine piecing, and gives also hints and tips which will help you to assemble this quilt faultless.

 The quilt measures 67" x 84" (170 cm x 210 cm) before washing and quilting.

Quilt sizes based on 17"/43.5 cm “Meeting with friends” block:

- Baby/Crib - approx. 34" x 50½" (86.5 cm x 128 cm) 

- Throw - approx. 50½" x 50½" (128 cm x 128 cm) 

              - approx. 50½" x 67" (128 cm x 170 cm)

- Twin - approx. 67" x 84" (170 cm x 210 cm)  (the quilt featured in this pattern).

- Full/Queen - approx. 84" x 100" (210 cm x 254 cm).

 It's an easy quilt pattern even for the beginning quilters and it is perfect for anyone who wants to sew a simple, cheerful, quick and modern quilt.

abeeautiulday.blogspot.com-Meeting with friends quilt pattern


Meeting with friends quilt is not difficult to make, but it does require a bit of precision.

 In this pattern you will find also suggestions and information for sewing quilts with different layouts, settings, dimensions and color combinations based only on this block.

This pattern is Fat Eighths, Fat Quarter and yardage friendly.

abeeautiulday.blogspot.com-Meeting with friends quilt pattern

Look how beautiful turn out my One block-pillow covers! Using only one 17" Meeting with friends block and your scrap pile, you could cheer up your dining room, bedroom and/or porch.  
 

abeeautiulday.blogspot.com-Meeting with friends quilt pattern

Both patterns are also budget-friendly because they give you the opportunity to use up your leftover fabrics for which you have been waiting for the quilts that will deserve them.

 If you don't want a busy quilt design and you are looking for a fast project for which you don't need any fancy tools, but only very basic quilting supplies, then these two quilts are for you!

You’ll end up with beautiful quilts that look like a pro made them!

Would you like to make at least one Meeting with friends mini quilt or quilt of your own? You can purchase this patterns by clicking here. You can get this patterns at a 25% OFF INTRODUCTORY PRICE now through Thursday, June 15 2023.

Thank you my friends!

Have a beautiful sewing day!


Monday, 5 March 2018

a sneak peek at the finished Racetrack Quilt

I finished the Racetrack Quilt.
I used for quilting straight lines following the patchwork design units but regarding their density, I composed an irregular grid of vertical and horizontal lines to avoid the quilt getting a stiff, static look.
Here is only a sneak peek at the quilt.


More details about the quilt, in a future post.


Have a beautiful day, my dears!


Wednesday, 14 February 2018

The Racetrack - New quilt in progress

I just finished a quilt for which I used only neutral prints and solids. A little bit warm neutral, a little bit cold neutral, a little bit white and a little bit black, trying to give balance to the whole composition.

Racetrack quilt - abeeautifulday.blogspot.com

I made a few quilt designs and I chose the one that suggests a racetrack. 
Working on the test quilt I liked that it was easy to make. Piecing only squares and rectangles. It needs only attention not to mess up the order in which they are sewn.
The variations that I have searched for the fabric choice confirmed that the quilt layout looks good in other combination of colors and prints too.
And I have one more mention: the Racetrack quilt is Jelly Roll friendly.

Racetrack quilt - abeeautifulday.blogspot.com

It's that kind of design that can be used both for large quilts and small quilts, by simply assembling more or fewer bloks or units. Also, it might be the perfect choice for a boy or man quilt.

Racetrack quilt - abeeautifulday.blogspot.com

I confess that knowing what hard it is to find a design when you have to sew a quilt for a man or boy, I have in mind to stay a while in this niche making more designs for quilts for the boys/men rooms.

The quilt top is ready. Now, to the big step - the quilting.

Racetrack quilt - abeeautifulday.blogspot.com

In the picture above the quilt lies flat. The quilt design gives the illusion of roundness. It's interesting that in reality, this illusion is not as obvious as in the picture.

Have a beautiful day, my friends!

Linking up with  Finish it up Friday!
                         Can I Get a Whoop Whoop?


Monday, 3 July 2017

I Love My Doll applique pillow cover quilt pattern is ready!


I just launched the pattern of a cute little quilt:
I love my doll!


Its dimensions -  16" x 16 " -  are ideal for a pillow case or a wall hanging for a lovely little girl.  
The pattern includes instructions for a pillow case.
The main technique is the raw edge applique - simple and fast. One border added to the doll block and the quilt top is ready. Oh, I forgot to tell you that the doll name is Emma.
I told you something about her and her sister a while ago when I introduced them to you.


The pattern provides:
- instructions for preparing the applique pieces
- instructions for piecing the quilt top
- instructions for preparing one color and two color prairie points
- suggestions for securing the applique edges and quilting
- instructions for finishing the quilt 
- instructions for assembling the pillow cover
- layout suggestions
- ready to print templates

There are 40 illustrations and diagrams gathered in 16 pages.
The measurements are in inches.

You need:
Fabrics 
- one fat quarter or 18" x 18" piece of fabric for border; 
- one fat quarter or 18" x 18" piece of fabric for backing
- one fat quarter or 16" x 22" piece of fabric for the pillow back
- a few pieces of fabric for the appliqued doll 
- 2 ½ " x 80" for binding
Batting 
- 18 " x 18" 
Fusible web - about 8 " x 18" or temporary adhesive spray or fabric glue that maintains its qualities after pressing.
Water soluble pen, red and black permanent markers
Scissors, coordinated thread
Open – toe foot for securing the applique edges


In addition to this pattern, I'm working on the templates of a few friends of Emma. Girls and boys. You will have the possibility to add one by one a collection of applique dolls for your kid's room or to choose the ones they like most.
Emma's friends will be available as templates only. You will use the instructions of Emma pattern, launched today, I love my doll!
Emma's friends individual templates will be listed in my Etsy pattern shop, as I will finish them.

I love my doll pattern is here.
I hope you will enjoy it!

Have a beautiful day, my dears!

Linking to Finish it up Friday!


Saturday, 8 April 2017

A sneak peek into my work room

I'm sure that I'm not the only one feeling energized by the fresh signs of Spring.
Every day the tree branches become greener and the sun enriches the color palette of the gardens encouraging more and more flowers to bloom.
In the morning I open the window and I can't wait to feel the cool air coming into the room. This gives me an unexpected strength and inspiration to work quick and happy and to sew more and more of the projects from my long to-do list.


So, I just finished another pillow cover quilt for a new pattern.
I made the design last year and let it wait until now.
It might seem a complicated layout but in fact, it is not. In the pattern, I do my best to explain all the leading steps to complete the quilt without fails.


Until it will be finished, If you need some inspiration for your future sewing projects, maybe you will find something here.

So that is all for today.
Back to work, now.

Have a beautiful weekend, my dears!


I am linking to Finish it up Friday!

Sunday, 2 April 2017

Something new to sew - Quilted Pillow Cover pattern release

Do you like applique?
I do. I always did.
It was just a matter of time to design my own pattern.
And here it is:


It's so easy to make, so quick to complete!

And sooo beeeautiful, isn't it?


The pieces are simple and symmetrical. Easy to cut, easy to fuse, easy to stitch down.


I know, it sounds like a shameless self-promotion, but actually, these are the grounds that had driven to writing the pattern.


You need only a few hours of work (looking more like a child's play), two fat quarters and a few fabric scraps and strips.


You might use this design also for a cute table topper or even for a lovely quilt.
One Happy Flowers pillow, table topper or wall quilt and you will feel like Spring and Summer are forever in your home.

I thought the pattern as a simple and friendly guide, providing
- a lot of pictures
- instructions for fusing, stitching, piecing, washing and for assembling the pillow cover
- all the necessary templates
- suggestions for layout variation

And to smooth its way into the world,

During 2 - 4 April 2017

 I will offer my 

Happy Flower Quilted Pillow Cover 

at a reduced price!

You are welcome in my shop!


Have a beautiful week, my dears! 


Sunday, 26 March 2017

New pattern on the go

In the last few weeks, I have been working on a new pattern.
It went unexpectedly well. The work was easy and fun. 
From the drawings to the cutting and sewing, everything bound so well.
It's an applique quilt for a pillow cover front which gives the perfect opportunity to use the pile of leftover fabrics and besides all to bring indoor the lovely signs of the warm season.


First time I used these flower design a few month ago. I wrote about it here. It had so much success that I wanted to use it again in another project. And so, I made this pattern called "Happy Flowers". 
It has one more step to go. Proofreading and testing.
And here comes my request to you: 
Is there anyone willing to help me in this matter?
Do you want to test my pattern?
Could you send me in about 10-14 days your feedback (including pictures of your work)?
The only way I can make it up to you is to offer the final corrected form of the pattern.


In case you need it, my email address is on the right sidebar - "Email me".

Hoping for a positive response from you.

Thank you!

Have a beautiful week, my dears!

Thursday, 11 August 2016

Forever Together quilt

It's finally done!

The quilt edges are so wavy because of the wire fence pattern.

I name it "Forever Together", inspired by the lovely couple who will own it.
The design embodies an old traditional motif, the Tree of Life, which I gave a particular layout, making it out of two mirrored stylized trees, one composing the top half of the quilt and the other - the bottom half, as you look at the picture above.
This is The Marriage Tree and brings together His Tree of Life and Her Tree of Life (the two quilt's halves).
At least that was my vision, for the sake of quilt's aesthetics.


The quilt measures 72" x 86".
I chose to try binding it using the quilt back. It was so simple, fast and fun! I am sure I will use this method again.

I have a few conclusions arising out of using this method, but they will make the subject of a  future post.
The quilt is not heavy, despite its dimensions, due to the cotton batting.

For the first time, I used for quilting Aurifil thread 50 wt. My sewing machine liked it so much that there was no need of any special tension adjustment. The thread has not broken even once.


I also liked so much using this Aurifill thread that I was close to change the quilting design on the go, by adding a denser pattern. Eventually, I said to myself to let the things as I initially thought and to preserve the thread for a future project having a quilting design that will put it in better value.

Until next post,
Have only beautiful days, my dears!

I'm linking to Linky Tuesday at Freemotion by the River

Friday, 3 June 2016

Opposites Attract Blog Hop - Country Home pillow cover

This is the third day of the Opposites Attract blog hop, hosted by Marian, here.
The challenge is to use only three colors and keep the project under 35 x 50".
Here is my project:


Country Home pillow cover
pattern by Mihaela Alexandrescu (me)
17" x 17"

The first impulse was to express the theme through the colors: two complementary colors on the white background. But I liked too much how this warm green and navy blue looks together. Because they are both cold colors I expressed the complementarity in the way they participate to the layout: placing them symmetrically, facing each other.


When I designed the quilting I continued the theme, on the one hand, by alternating the straight lines with the curved lines and on the other hand, by alternating the surfaces with different quilting density.


The binding relaxes the whole composition. It gathers all the three colors but refuses the opposition. Even if it was also about attraction in there :) One corner is a little different than the others. No more symetry!


Thanks for stopping by!


Don't forget to check out the other participants of the blog hop!

June 03


Here are the giveaways offered by Marian:

a Rafflecopter giveaway


a Rafflecopter giveaway

Have a beautiful day, my dears!

Friday, 22 April 2016

My dear doll - two pillows for two little girls

I finished the mix-of-techniques project started about ten days ago.

I  have drawn the two dolls having in mind that they will become appliques: with simple shapes, minimum details and above all, not too small pieces.

At the same time, I was thinking about what kind of stitches I will use for securing the edges in an esthetic and functional way - they will be on usable objects and will be washed many times.


But then another problem came up: to use one color of thread or many? As you may see, I chose many. I kept the same thread in the bobbin (a simple thread I used for piecing), so I changed only the upper thread and the whole thing was not so time consuming. Yes, it is not the first time I broke the "use-the-same-quality/color-thread-on-both-places-of-your-sewing-machine" rule. Usually my sewing machine approves this.
I stitched first all requiring the same color of thread and then I moved to those needing another color, and so on.
Besides doll faces elements and names, I did all the other stitches having the quilt top on the batting and backing, as I wanted the dolls components to detach from the background.
For the faces and names I digitized the drawings and gave the stitching job to my embroidery machine. But I'm sure they give no problem even for a beginner in hand embroidery.


The patchwork part shows its simplest layouts: the green frames added to the central dolls panels and a few pieced patches for the two colors-prairie points.
The quilting includes the stitches of the appliqued dolls and the straight lines stitched throughout the frame. I used both the free motion foot (for the hair, hearts and background) and the walking foot.

While writing these things I realized that it is more complicated to describe in words than do "My dear doll" mix-of-techniques-project.


I keep working on this pattern.
Maybe someday somebody loving both embroidery and quilts will like to have it and make it.

Have a beautiful day, my dears!

I'm linking to Finish it up Friday!


Friday, 11 March 2016

Urban Folk quilt - gift idea for a man

 A few things to polish and verify for the Urban Folk quilt:


Here is another test. A pillow cover. I showed you just a little of it some time ago.


I gave it already as gift to a very special man. Actually I selected the fabrics having him in my mind.
In a nut shell: upcycled denim, scraps, strings, hand dyed fabric, quilting fabrics.


About the quilting style: I like these waving and straight lines flowing over the simple patchwork. For the time being I don't see an elaborate quilting design for it. Who knows what I will think about this in the future? We will see.
Creating is a never ending story, isn't it?


Have a beautiful day!

I'm linking to Finish it up Friday!


Wednesday, 10 February 2016

Valentine's Day Idea - "You & Me" free quilt pattern

For those of you loving to make with your own hands gifts for friends and family, I come with an idea for Valentine's Day and not only.
Of course, it's a quilt. An applique quilt. A little one, easy and fast to make measuring only 16 1/2 " x 16 1/2 ".
The layout is simple and versatile. The message is warm and tender. At least this was my intention.

Here is how it looks:
I used denim in deep navy blue color for the heart design.

The good news is that I am about to finish writing the pattern.

 
The better news is that You & Me quilt pattern is my gift for Valentine's Day for all of you considering my occasionally newsletters about my creative work in the Quilting Land deserve to be read and visiting my blog does not mean wasting of time.

In a few hours all my subscribers will receive the newsletter with the link leading to the You & Me quilt pattern free download.
It is a .pdf pattern. You can read it and print it with Adobe Acrobat Reader installed on your computer. If you don't have it, you can find it here for free.

The pattern has 10 pages full of step by step instructions, suggestions and tips, a lot of images and the printable templates for cutting the applique pieces.

You might use the "You & Me" design to make a pillow cover for worming up your or his/her soul in almost any kind of interior. Or why not, in all kind of colors or prints combinations, it could accompany you in almost any kind of exterior relaxing place. It might be also an inspired engagement or wedding gift.

If you would like to sew this quilt and you are not on my newsletter list yet, you have still little time to sign up using the widget on the right side bar.

I hope you will like the You & Me quilt pattern and sew it!

Have a beautiful day, my dears!

Edited to add:

The newsletter took off! Welcome, my new subscribers!
I hope you all got the pattern and everything is Ok!


Monday, 18 January 2016

Urban Folk Mood Quilt - 2 - playing with the winter colors


I'm polishing the Urban Folk Mood quilt pattern.


In this version, I wanted to give equal chances to be seen to the two patchwork units of the top and bottom bands. The way to do this was using for both units vivid and pastel colors/shades, but in their succession, I wanted to get out of the symmetry of the pieced blocks geometry.
I kept the quilting design (simulating the weaving threads) as in the first version because I want the quilt layout to stay in a manner near to my inspiration source: a traditional handcrafted rug.

This is a little quilt, for a decorative pillow or a wall quilt.
The next version will be a baby quilt and will have a few prints.

Have a beautiful week, my friends!

I'm linking to Finish it up Friday!

Friday, 30 October 2015

Bluebell Handbag Pattern release

Hello, my Friends!
Have you been looking for a nice new bag pattern?

Today I am happy to launch my first bag pattern!


 It is a handy and roomy bag: 14" (36 cm) wide; 14" (36 cm) tall; 7" (18 cm) deep. This means that you have enough place for all necessary things: wallet, phone, tablet, a few books, and even for small shopping! 


It is a versatile bag. It is s
uitable for quilting cotton reinforced with fusible interfacing and/or batting, but it is suitable even for home decor weight fabrics.

The pattern includes:
            - fabric reinforcement tips
            - guidance to make up and apply piping to the bag base


            - detailed instructions for magnetic snap closure


            - detailed instructions to sew a zippered pocket on one side of the bag


            - directions for attaching metal rings to handles


You will receive 32 pages of easy to follow step by step instructions and 89 color photos and diagrams, plus one printable template to make this handbag.

The measurements are in both inches and centimeters.

Thank you, Geta, Kat, and Silvia for reviewing the instructions! Your help was so precious for me!

To celebrate this launch, Bluebell Handbag Pattern but also Country Home Pillow Cover Pattern are for one week at a reduced price.
Here, in my shop.

https://www.etsy.com/shop/MACdesignQuilts
Click on the photo above

Thank you for your support!

I am linking to Finish it up Friday!

Have only beautiful sewing days, my dears!